My project in a nutshell was to model an existing house to scale by measuring and then translating my rough floor plan drawing to Revit and then creating a proposal for an extension based on my client’s needs and wants.
![]()
My project in a nutshell was to model an existing house to scale by
measuring and then translating my rough floor plan drawing to Revit
and then creating a proposal for an extension based on my client’s needs and wants.
The purpose of is project was to get some industry experience and to develop my
skills relevant to a potential industry. At the beginning of this project, I set some
goals for myself to complete so that by the end of the project I would be better off
and have a higher understanding of architecture and the professional process that goes
into completing a project. The main software I was focusing on is Autodesk Revit which
gets its name from revision edit, with the idea being that it’s easy to modify and edit
work creating a free-flowing user experience.
Revit is a BIM software (building information modelling) and is user to simulate building
and their components both in 2D and 3D.
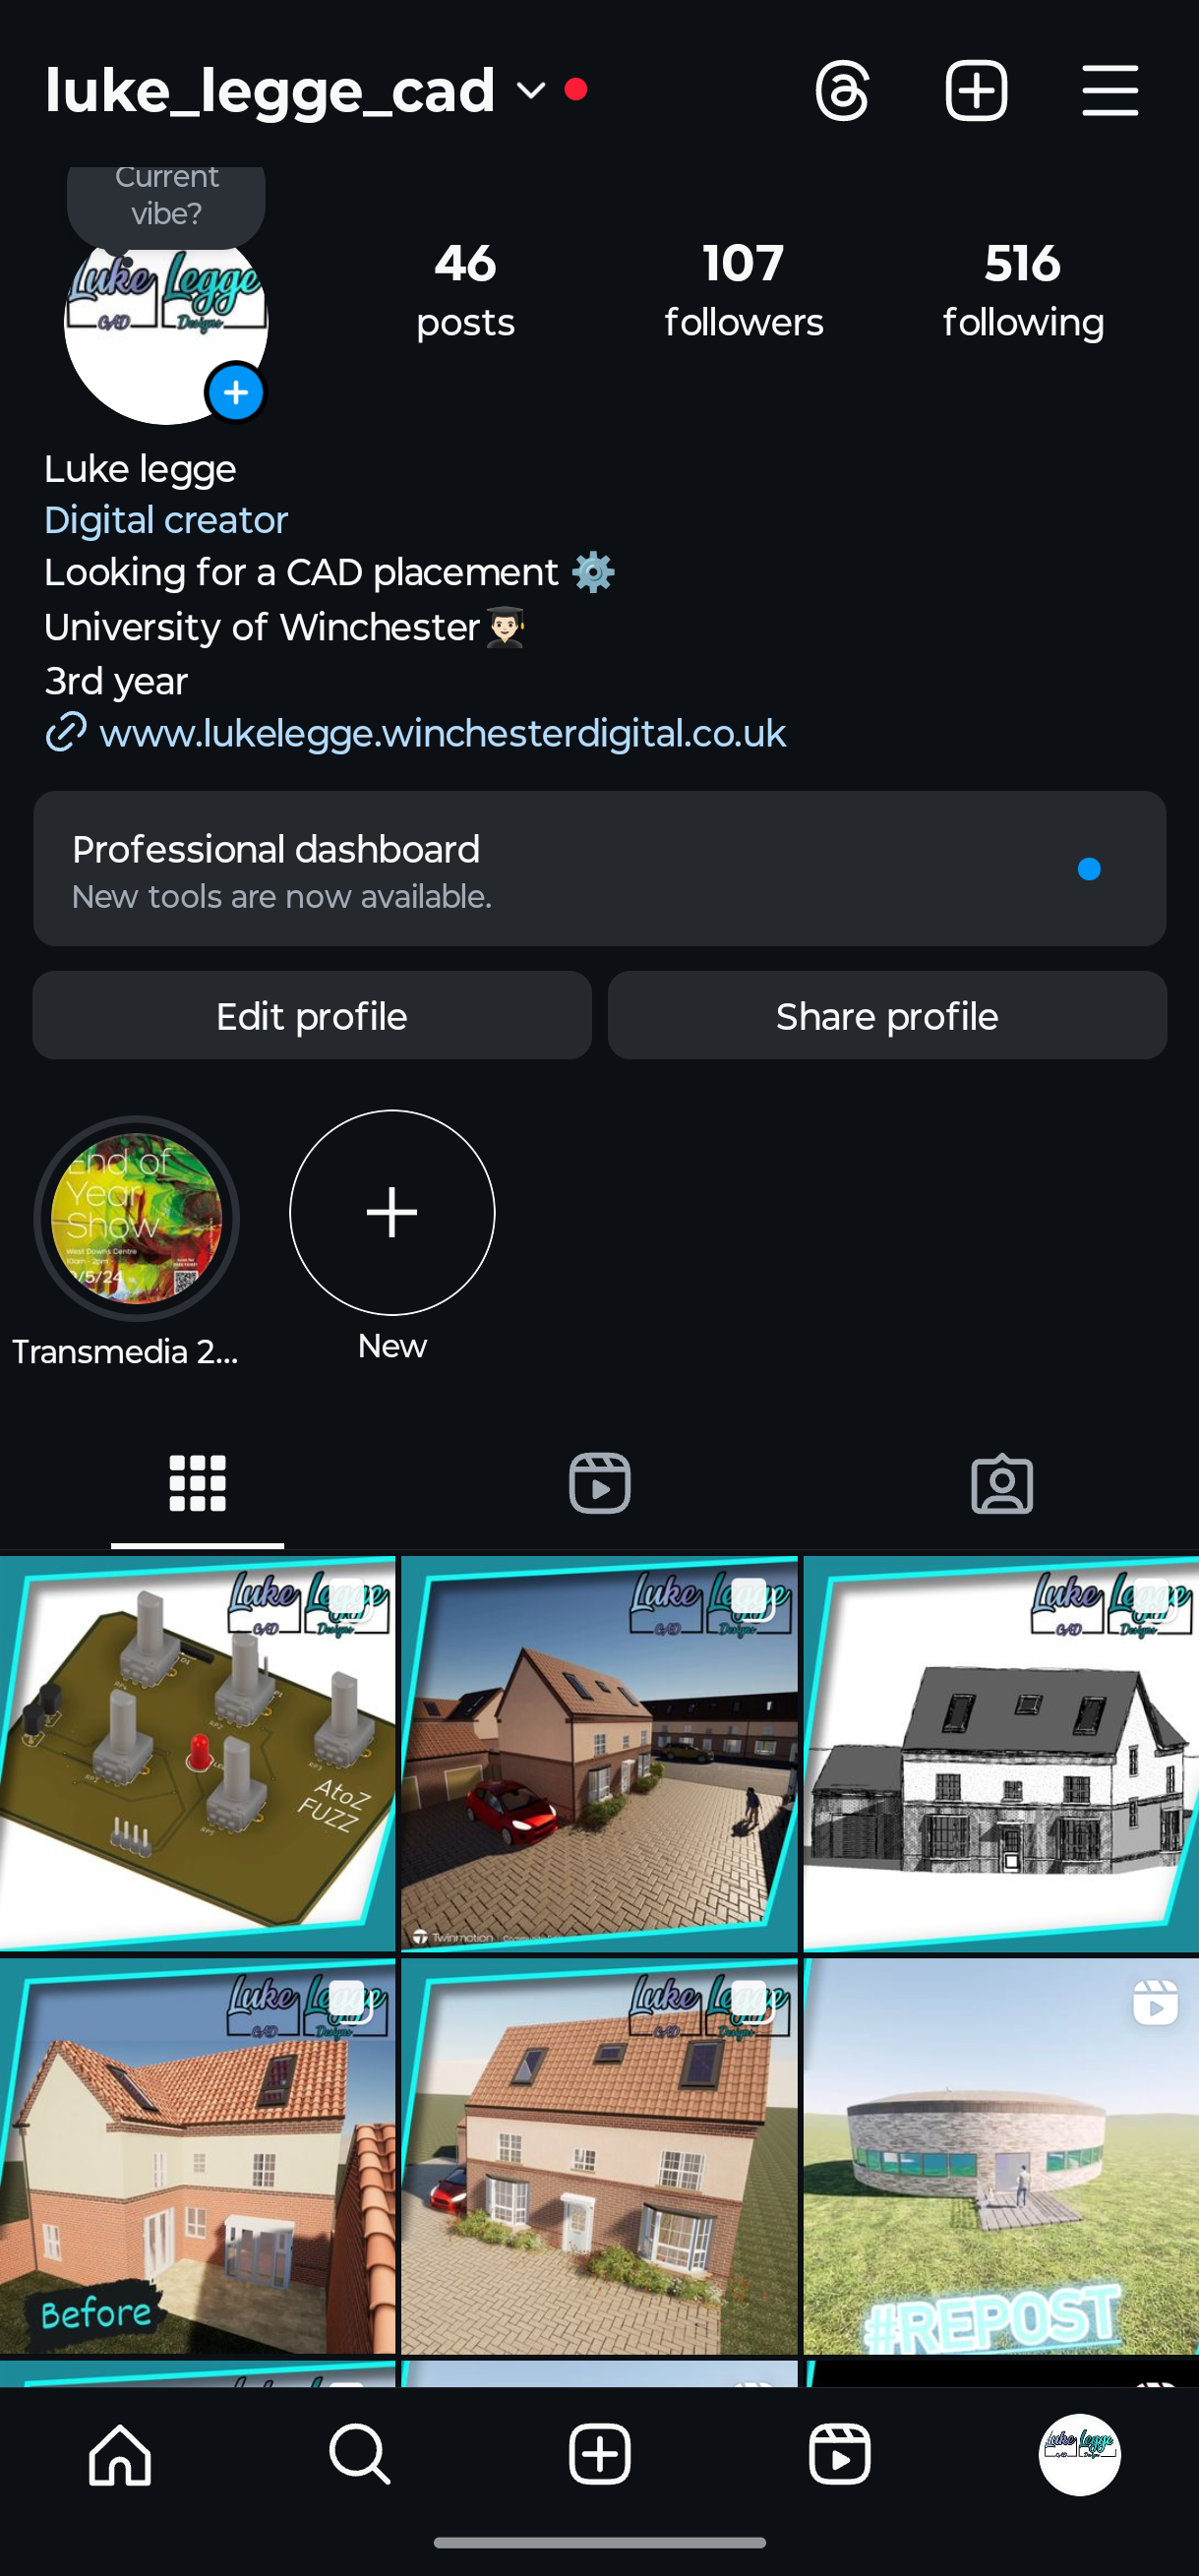
I also wanted to use this project to increase my social media presence, I will do this by creating
professional grade renders of my work to promote myself, which is why I’ll be focusing on the visual
aspect of the design through twin motion, a free to use rendering software.
The placement was related to SDG 12(sustainable development goal 12) , https://sdgs.un.org/goals/goal12
The SDG goals are a set of 17 goal set by the United Nations to better the planet, there are 17 goals but 169 target within these goals and the purpose of eradicating
poverty and in hopes of creating a sustainable future. These targets were original set in 2015 and are to be completed by 2030 by all United Nations countries.
My project was based around architecture, more specifically, domestic architecture; the project was to model
an existing version of a house in Autodesk Revit and then to model a proposed extension complete with floor plan
drawings, a 3D model fully rendered and to scale.
I did my placement at a local architectural firm, BDarchitectural (Brad Davison architectural). I spent my
time with Brad who’s been in the business for over 20 years and has recently set up his own practise BDarchitectural.
Brad has completed many projects over the years and the quality of the work was very high and an inspiration to me.
the project aim was to develop my skills in Autodesk Revit to an industry standard to better my experience for future work.
Objectives
1. To have a better understanding of Revit and become more comfortable within the software when designing and creating.
2.To have floor plan drawings displaying both the ground floor and first floor and a site plan complete with existing and proposed versions
3.To have a photorealistic render of the model created in Twinmotion and to have a walk-through video showing off the proposed extension.
By having these goals set for myself the project became about self-development and to better my skills. The reasoning for my objectives surrounding my aim
was so I could have high quality work I can be proud of and show off on my portfolio in order to promote myself for future projects.
Strengths
going into this project I feel my strengths were that I’ve already got some basic experience with architecture as I’ve done some projects around architecture
in the past, so I’m not completely new to Autodesk Revit however there’s room for improvement. I’m also passionate about the topic therefore I have a drive to
learn and better myself so I can diversify my skills so I can become an overall specialist.
Weakness
I had a few weaknesses going into the project, my time management was a disadvantage because in doing the project I was home over the summer therefore my time
to do the project wasn’t as open as I initially thought. Because I was home over the summer, I was spending time with family and balancing a full-time summer job.
Opportunities
The project presented many opportunities as I have now built a connection with someone already established and successful within the industry.
I now also have a potential reference for future work, and I have an industry standard project that can be displayed on my portfolio to advertise my skills.
I also had the opportunity to get a feel for what it’s like to work within an industry environment as I got the chance to go to Brads office
and experience his workflow and look at the scale of all of his on-going projects so I now have an idea of how much would be expected from me within the industry.
Threats
Potential threats to this project were my own time limits and not reaching deadlines, because as of starting the project I was relatively new to Revit, therefore
I’d get stuck on tasks and adding in features, to overcome this I did my own research on my issues to find a solution online and betted my own knowledge of the software and
became stronger because of it.
For this placement I had roughly 7 weeks as I completed my project with BDarchitectural over the summer where I was juggling family time and a full-time job, I wasn’t
committing many hours per week, roughly over the 7 weeks I’d say I achieved the 80-hour minimum for my course.
Gantt charts are a common project management tool that assist planning and the scheduling of tasks within a project. They are an effective tool that can be used to benefit
all sizes of project. These charts have a graph-like theme which aid the progress of tasks through visual representation.
When beginning this project, I chose a Gantt chart to manage my time as this method has worked for me in the past as I like to have visual
representations of tasks so I’m able to see how far I’ve come and how far is left to go.
Time management was important because to keep on task over the summer when I was already busy wasn’t going to be easy, making a Gantt chart essential.
“Time management can help you learn how to make decisions, set goals, and budget your time skilfully. It’s a way to stay organized and learn to prioritize your activities
based on their importance.”myhours.com(2024) the importance of time management available at: //myhours.com/articles/the-importance-of-time-management [accessed 29 October 2024].
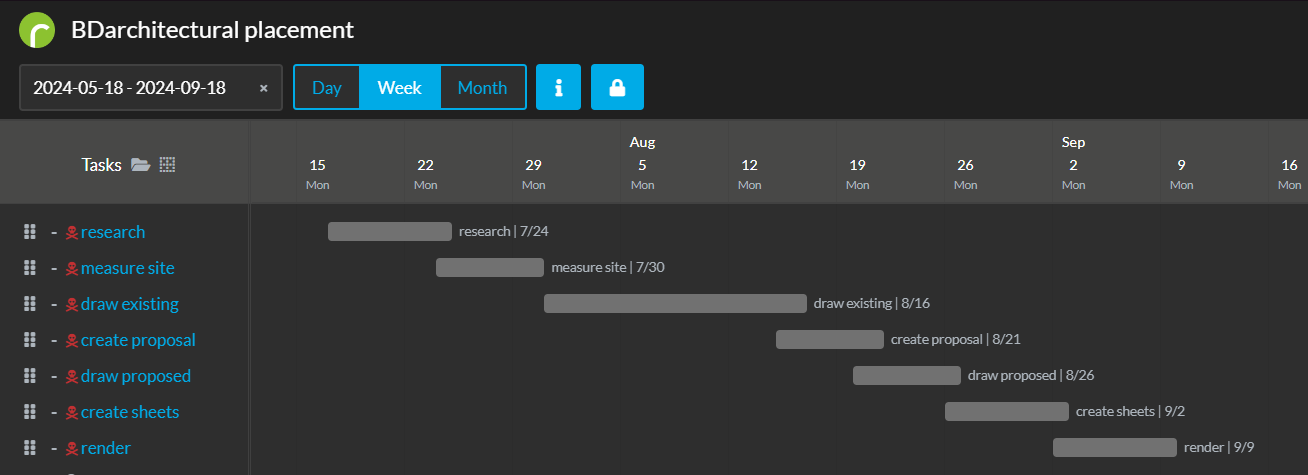
As seen above in figure 1 is a Gantt chart I made to aid with this project, its basic yet effective. Displayed are the basic tasks I set myself to complete the project for the client.
I feel like this Gantt chart worked for me as its basic and clear however all relevant information is easily accessible.
The design brief set by BDarchitectural was to measure and model an existing house and then create an extension that is in line with the clients wants and needs as a proposed model.
To complete this brief I use Autodesk Revit which is a powerful tool for producing industry standard architectural projects and is widely used by many active experts in the industry today.
As an aspiring architect it was imperative that I through practiced and developed my skills in the software. I also used Twinmotion for the rendering as this software is free and can also
produce some nice-looking results, which is ideal for my portfolio to show off my skills. As well as being free the software is also incredibly powerful and easy to use with a large library of
assets that will help give my materials a photorealistic look, boosting the overall appeal of my work.
Throughout the process of this project there’s been a lot of research and effort that went into the final product. When I first began the project the head of BD architectural came on
site to help and guide me when measuring the property. I was able to get my own laser measuring device from amazon for a reasonable price and this device helped me to accurately measure
the property so I could then create a true to scale model within Revit. Using the measuring device, I created a rough sketch of the floor plan(below).

It was critical that at the beginning of this project that I measured up correctly, this is because it can have severe implications when the building stage takes place,
it can affect everything including the ordering of the materials and the precuts and the installation. By researching and creating a sketch of the floor plan it helped when
modelling the building by having a visual guide to refer to therefore speeding up the process of modelling. I also measured the 2nd floor just in case the extension was to
overlap with the floor levels(below).

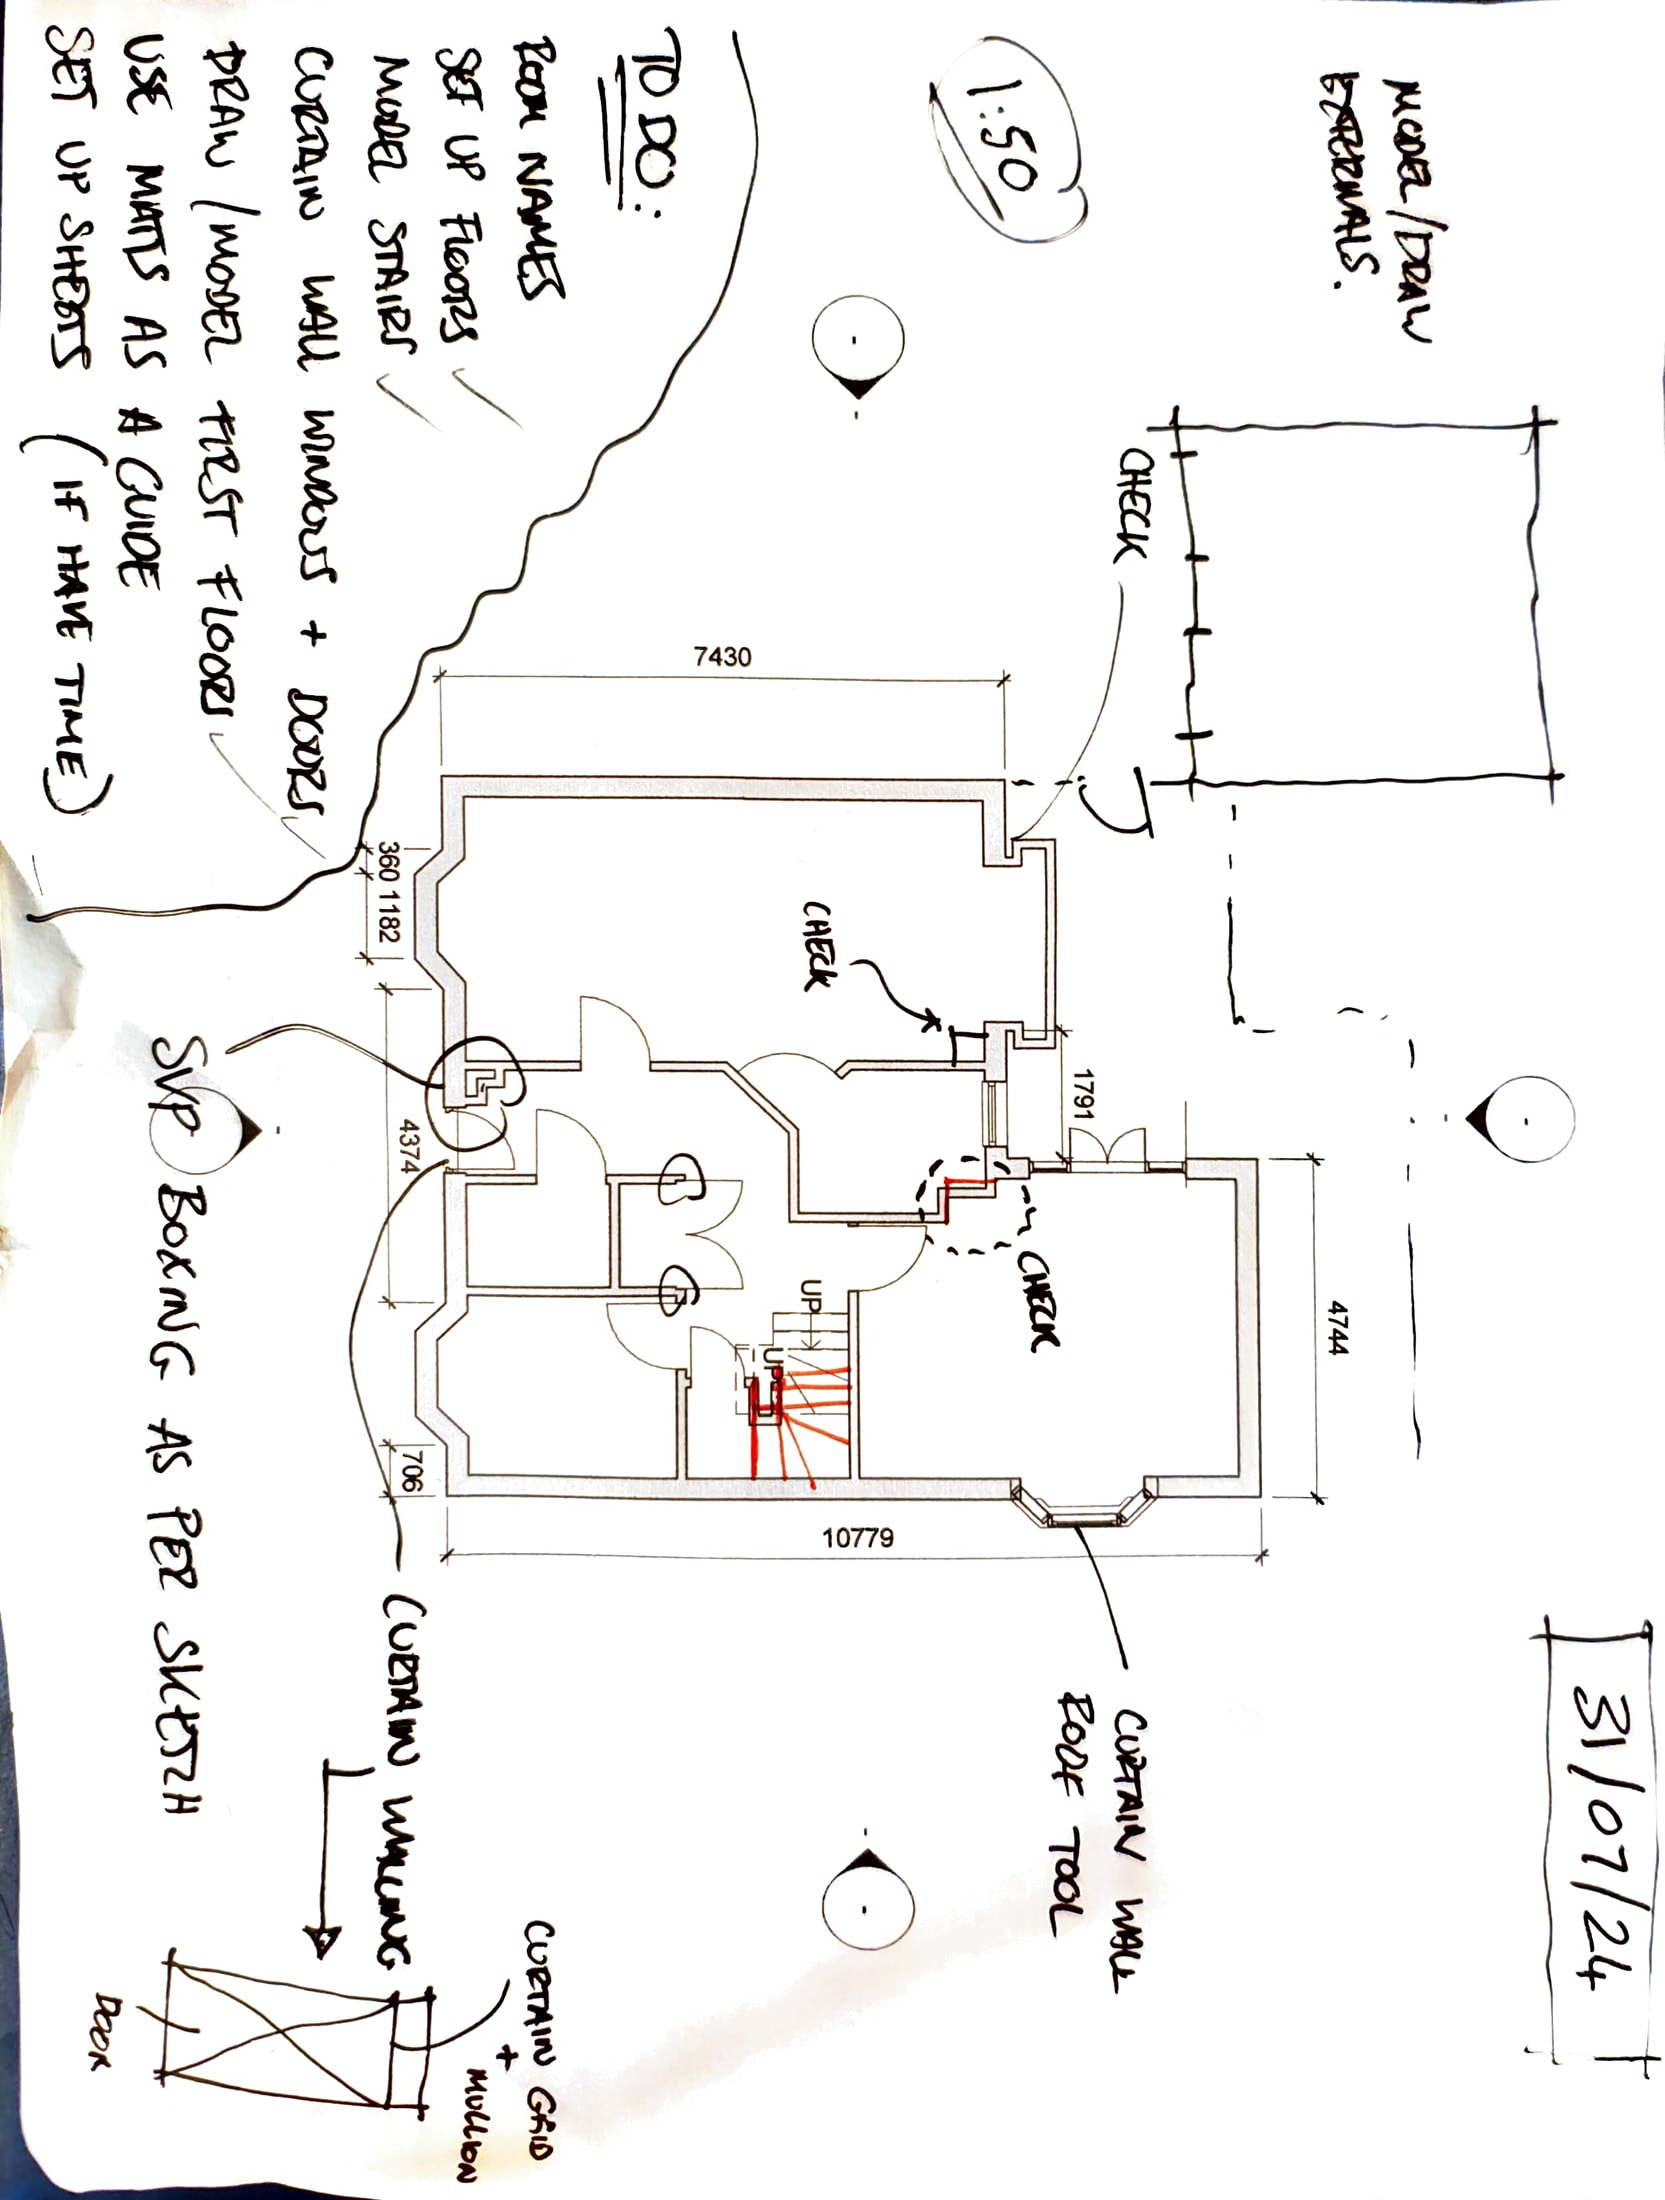
After creating the draft existing drawing(above) I had to measure all the walls due to issues within the set up of the walls, I had set the walls to be too thin so when
I thicken them it altered all the measurements and made them regular and different to the actual measurements of the property. The image above was my drawing of the existing
version of the property and then Brad from BD architectural added some notes that I went back on and check, changed or added. A few tips given was to change the usage of the
windows and doors tool to the curtain walling tool, which allowed me to add mullions and automatically embed the window/door into the wall, making for an easier and better experience,
this is because is a window/door needs to be moved the component is embedded and the cut out for the wall is brought to the new location with the window or door. After this feedback I
also had to remeasure as some of the objects in the project needed to be double checked for the correct measurements.
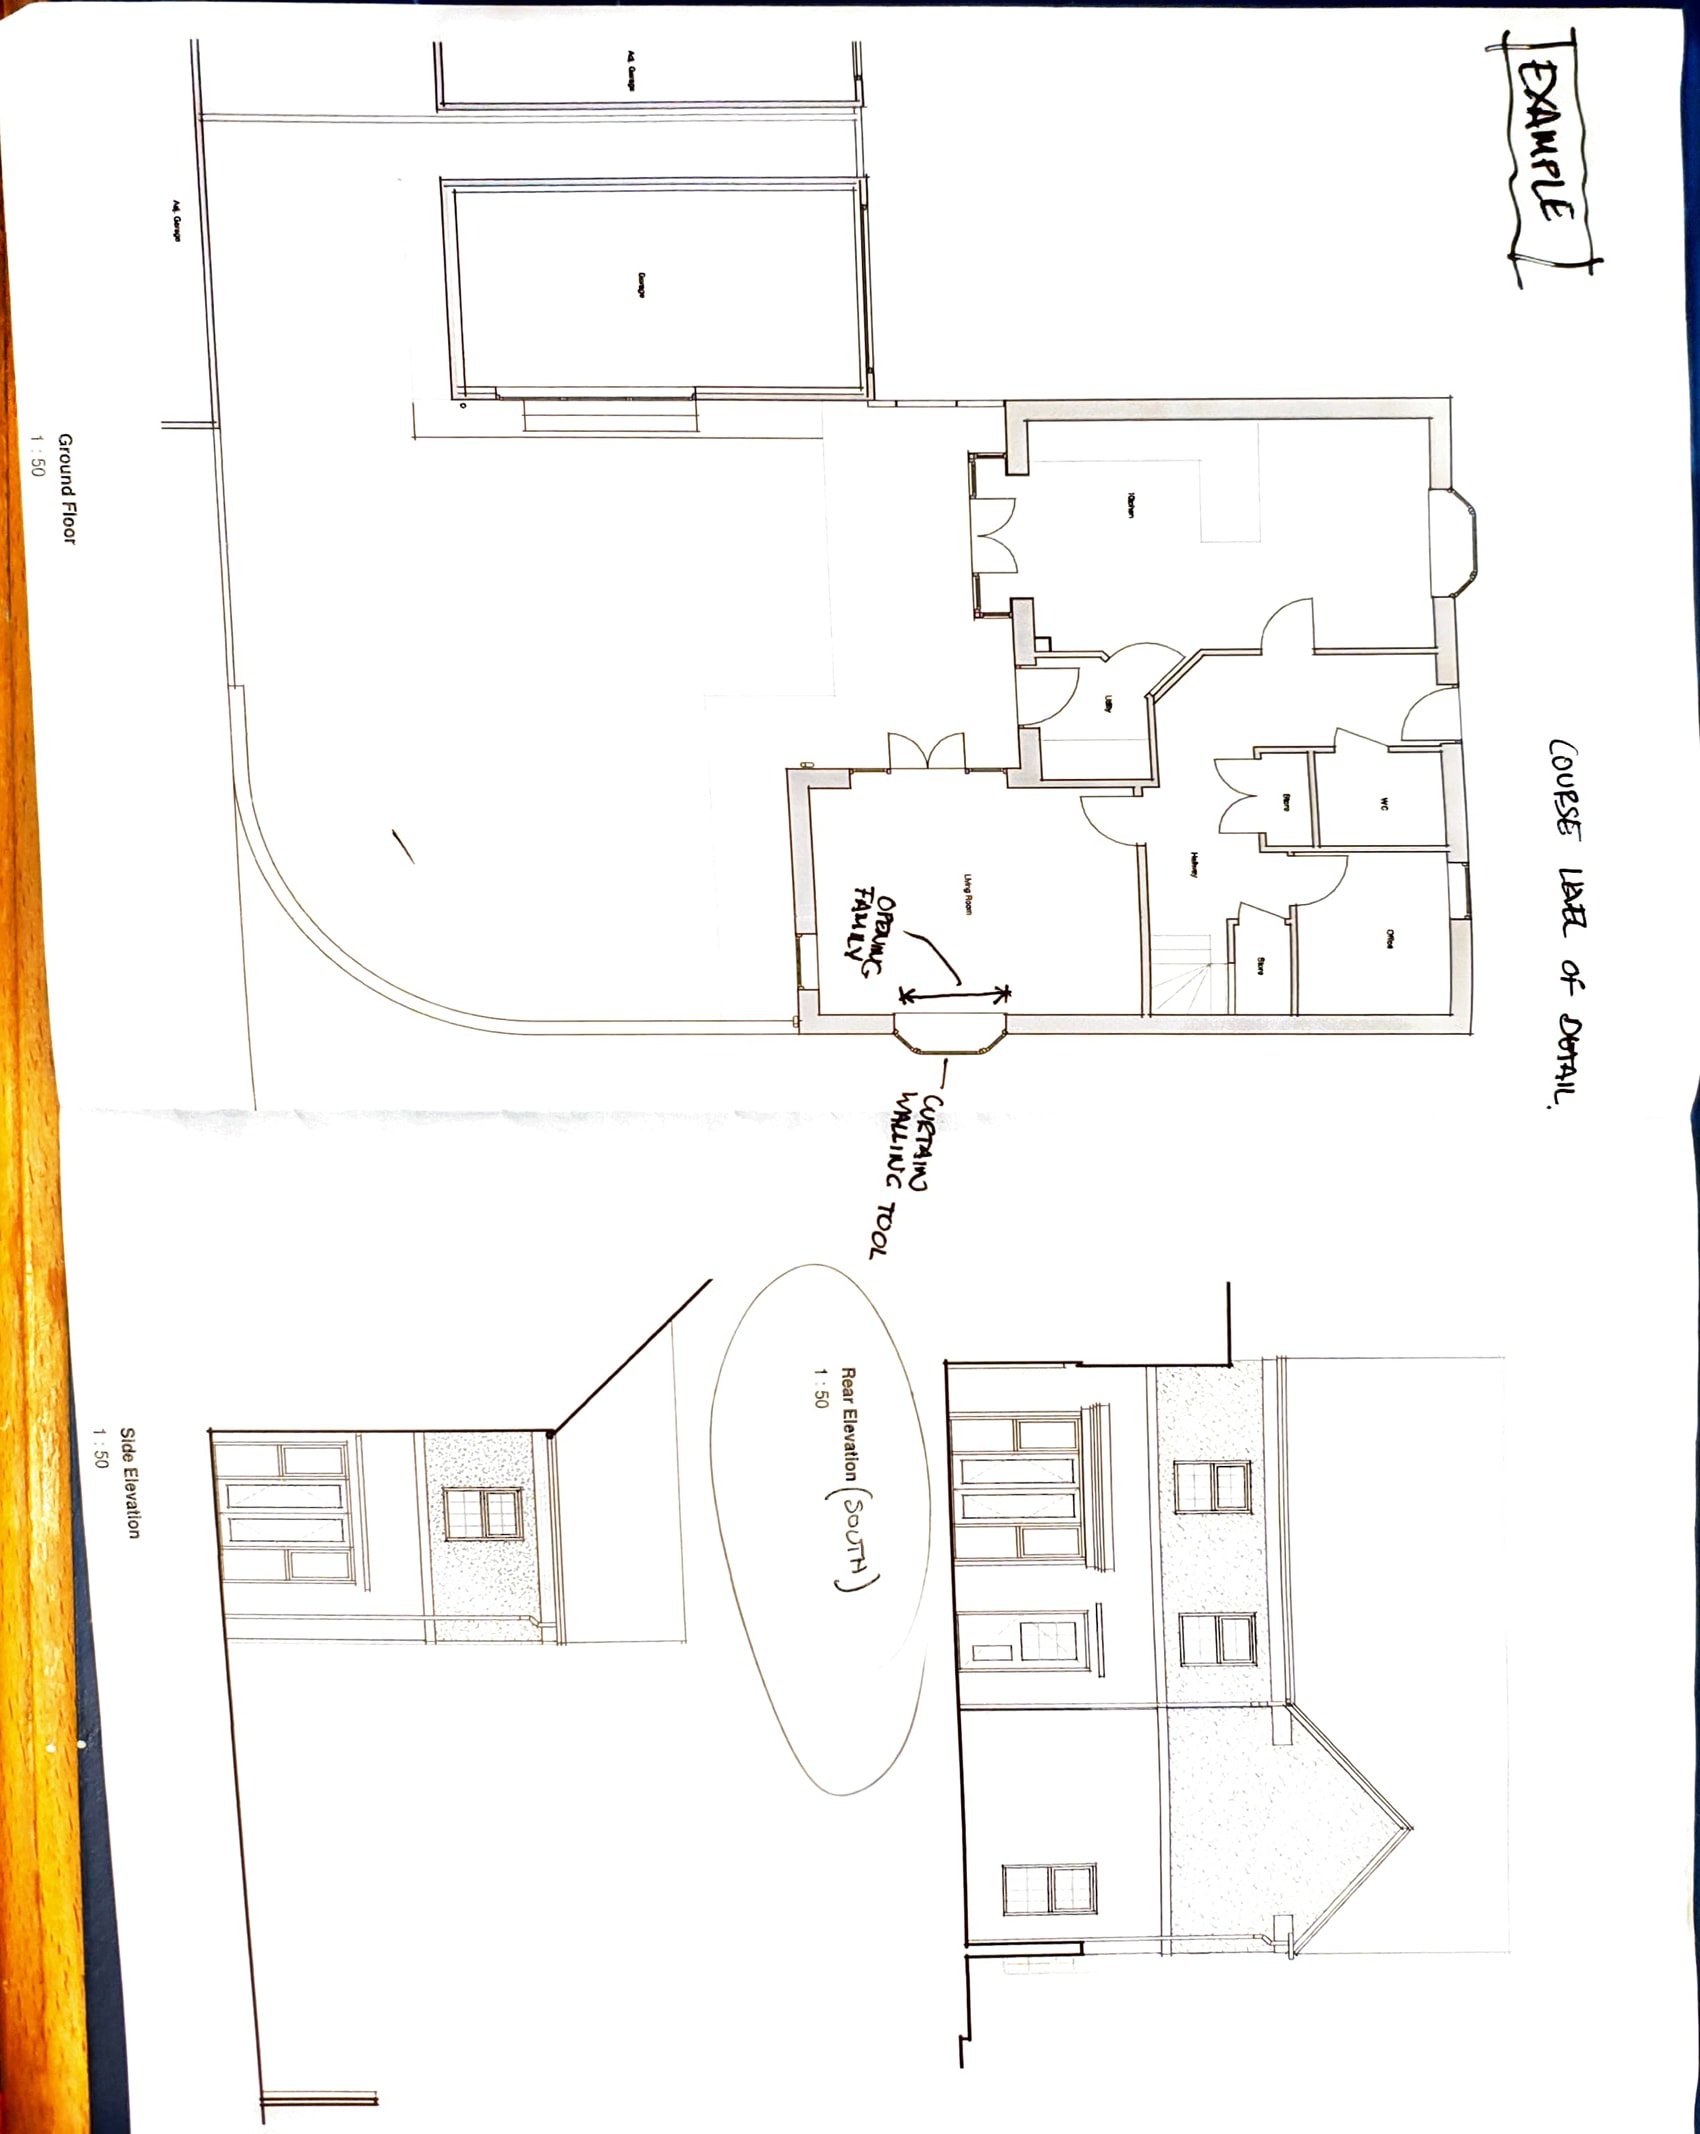
I had also been given an example of what I was aiming for. The example (above) is the floor plan and elevations for a house similar to my own.
This gave me a clear idea of what I was aiming for and the standard of work expected from me, and the way in which to format my work.
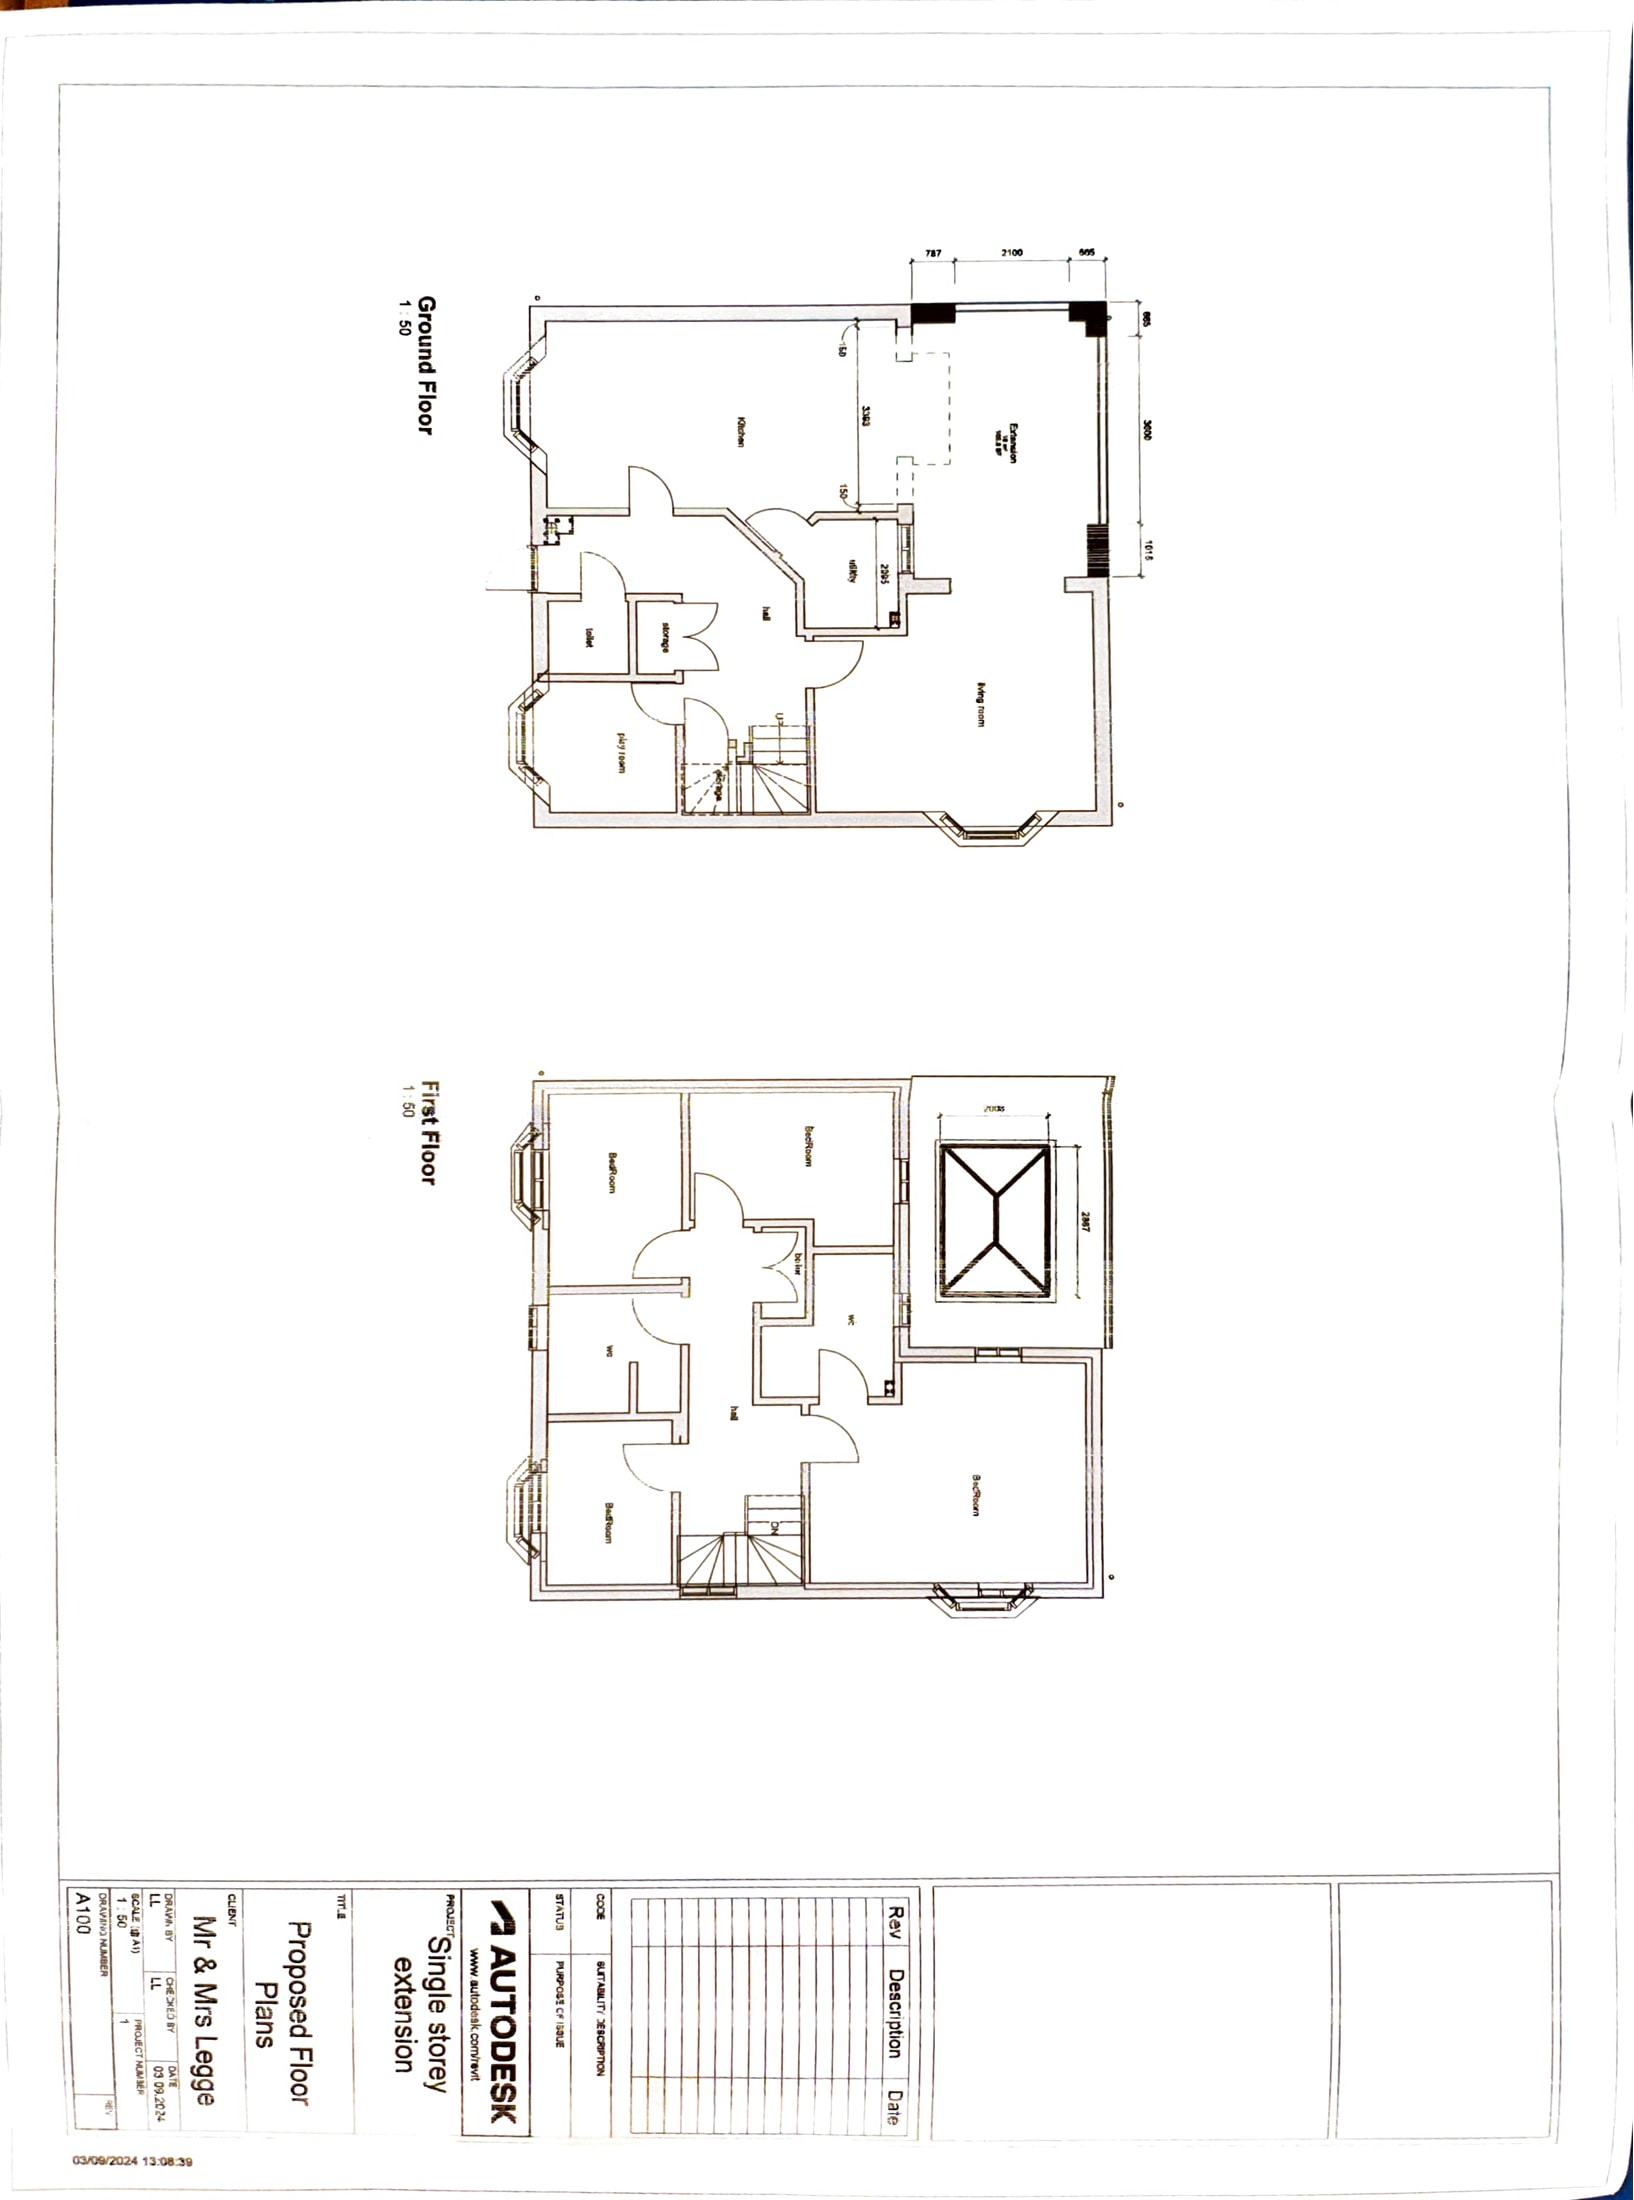
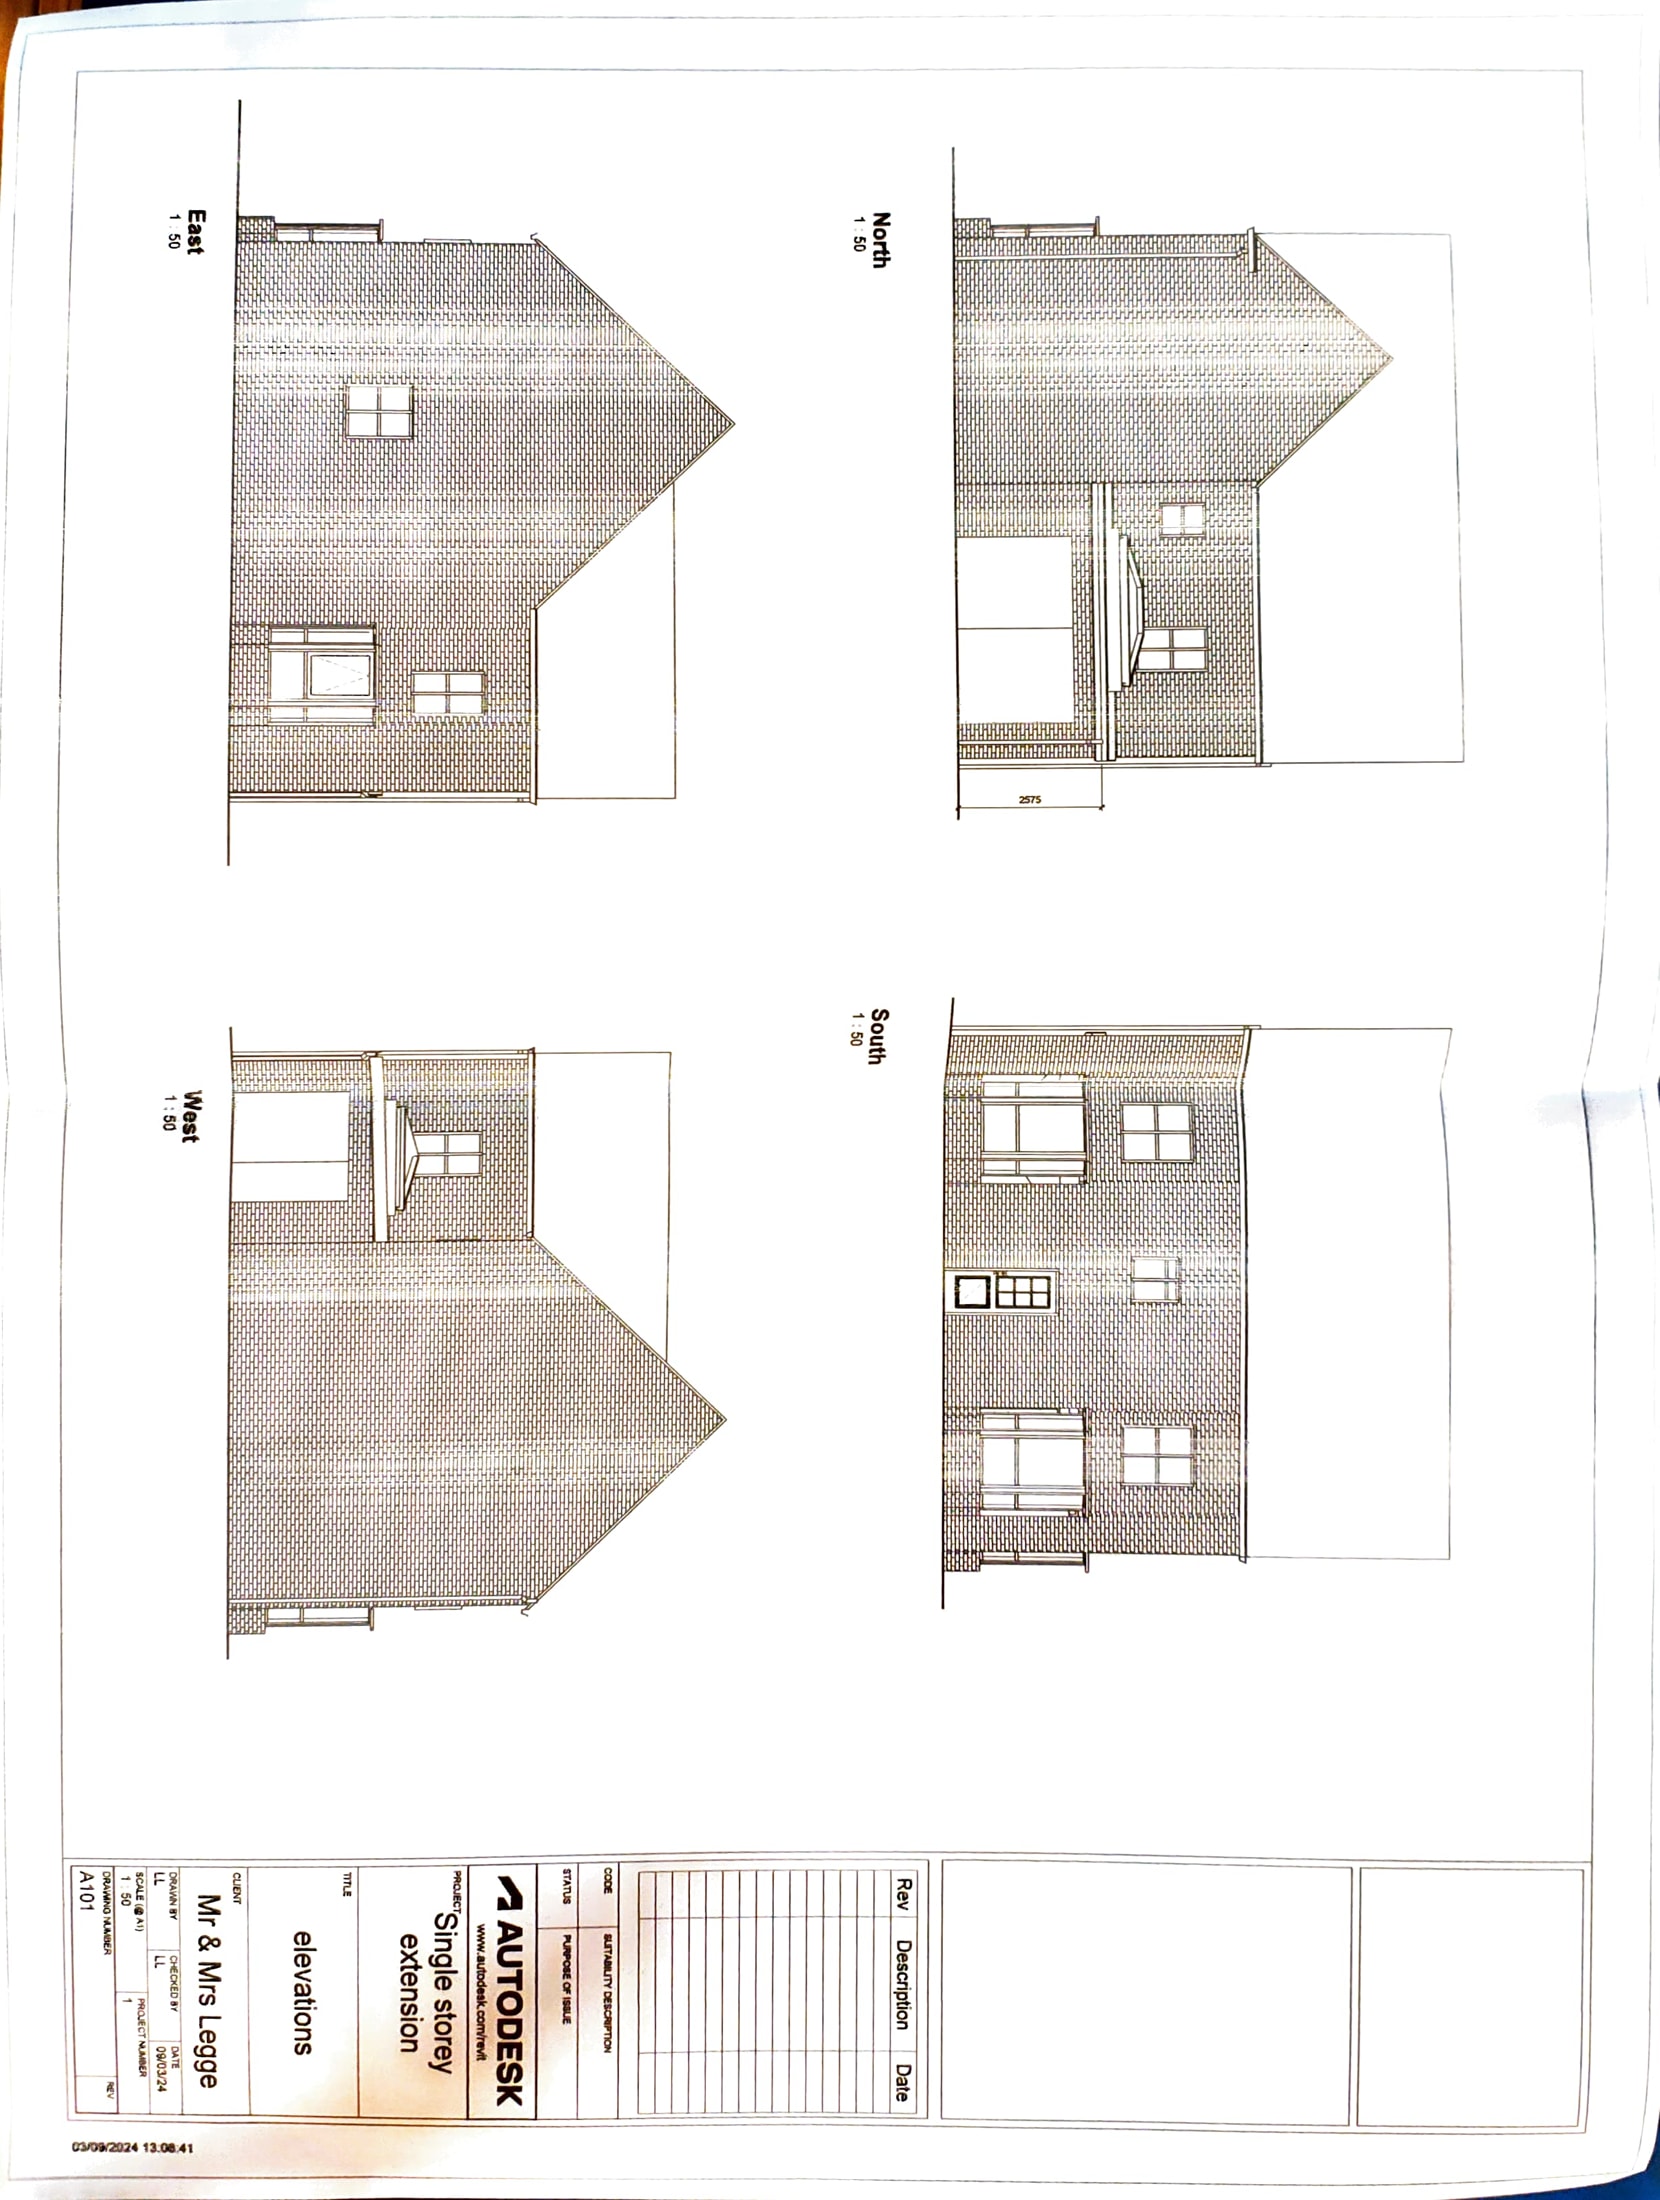
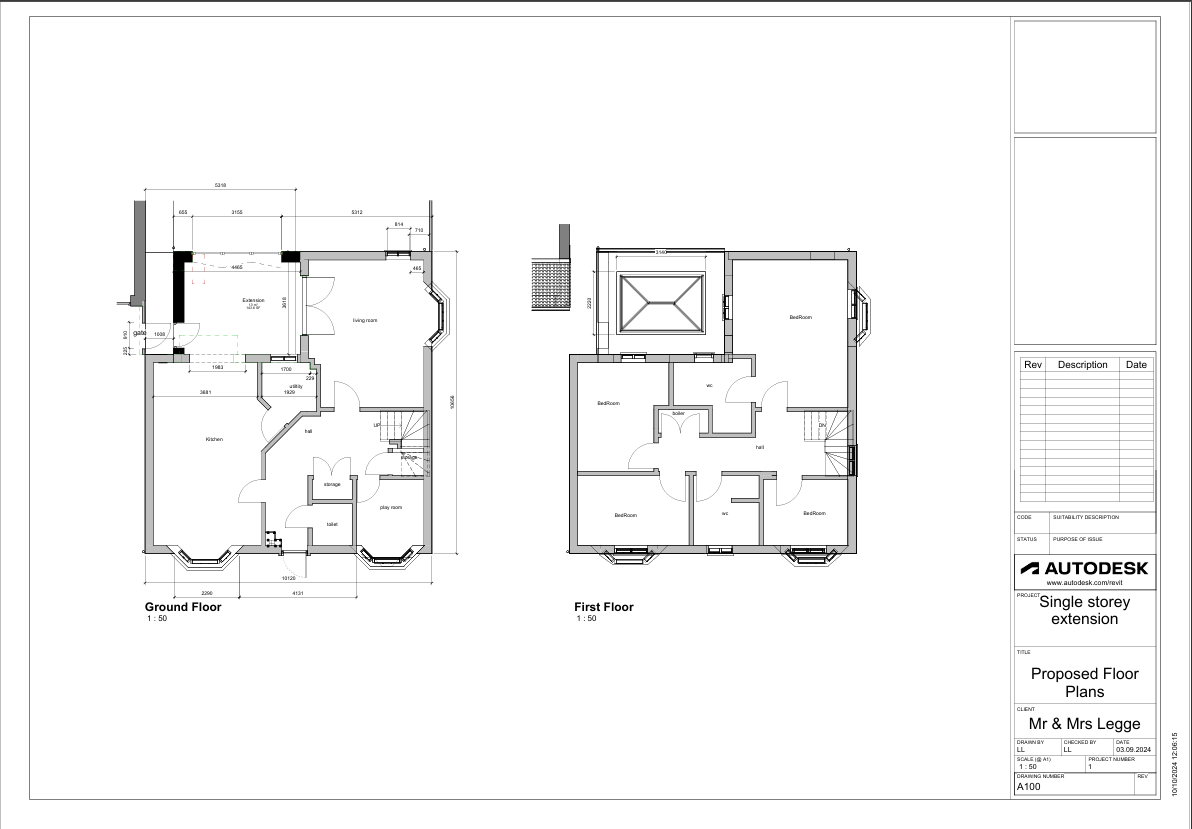
The plans and elevations (above) are my final design for the project. As seen from the previous floor plans, I have added the extension to the side of the house.
It’s a common misconception that this would be called a rear extension however due to the extension not starting from the rear most point of the property this is not the case,
it is considered a side extension.
To show that where the extension is, and which part of the plan is new I have changed the colour of the drawing to be a solid black wall, so it’s clear which area is new and is not yet
existing on the property. I have also used a dashed line to outline where the doors used to be to make it clear within my plans what has been removed and what has been added.
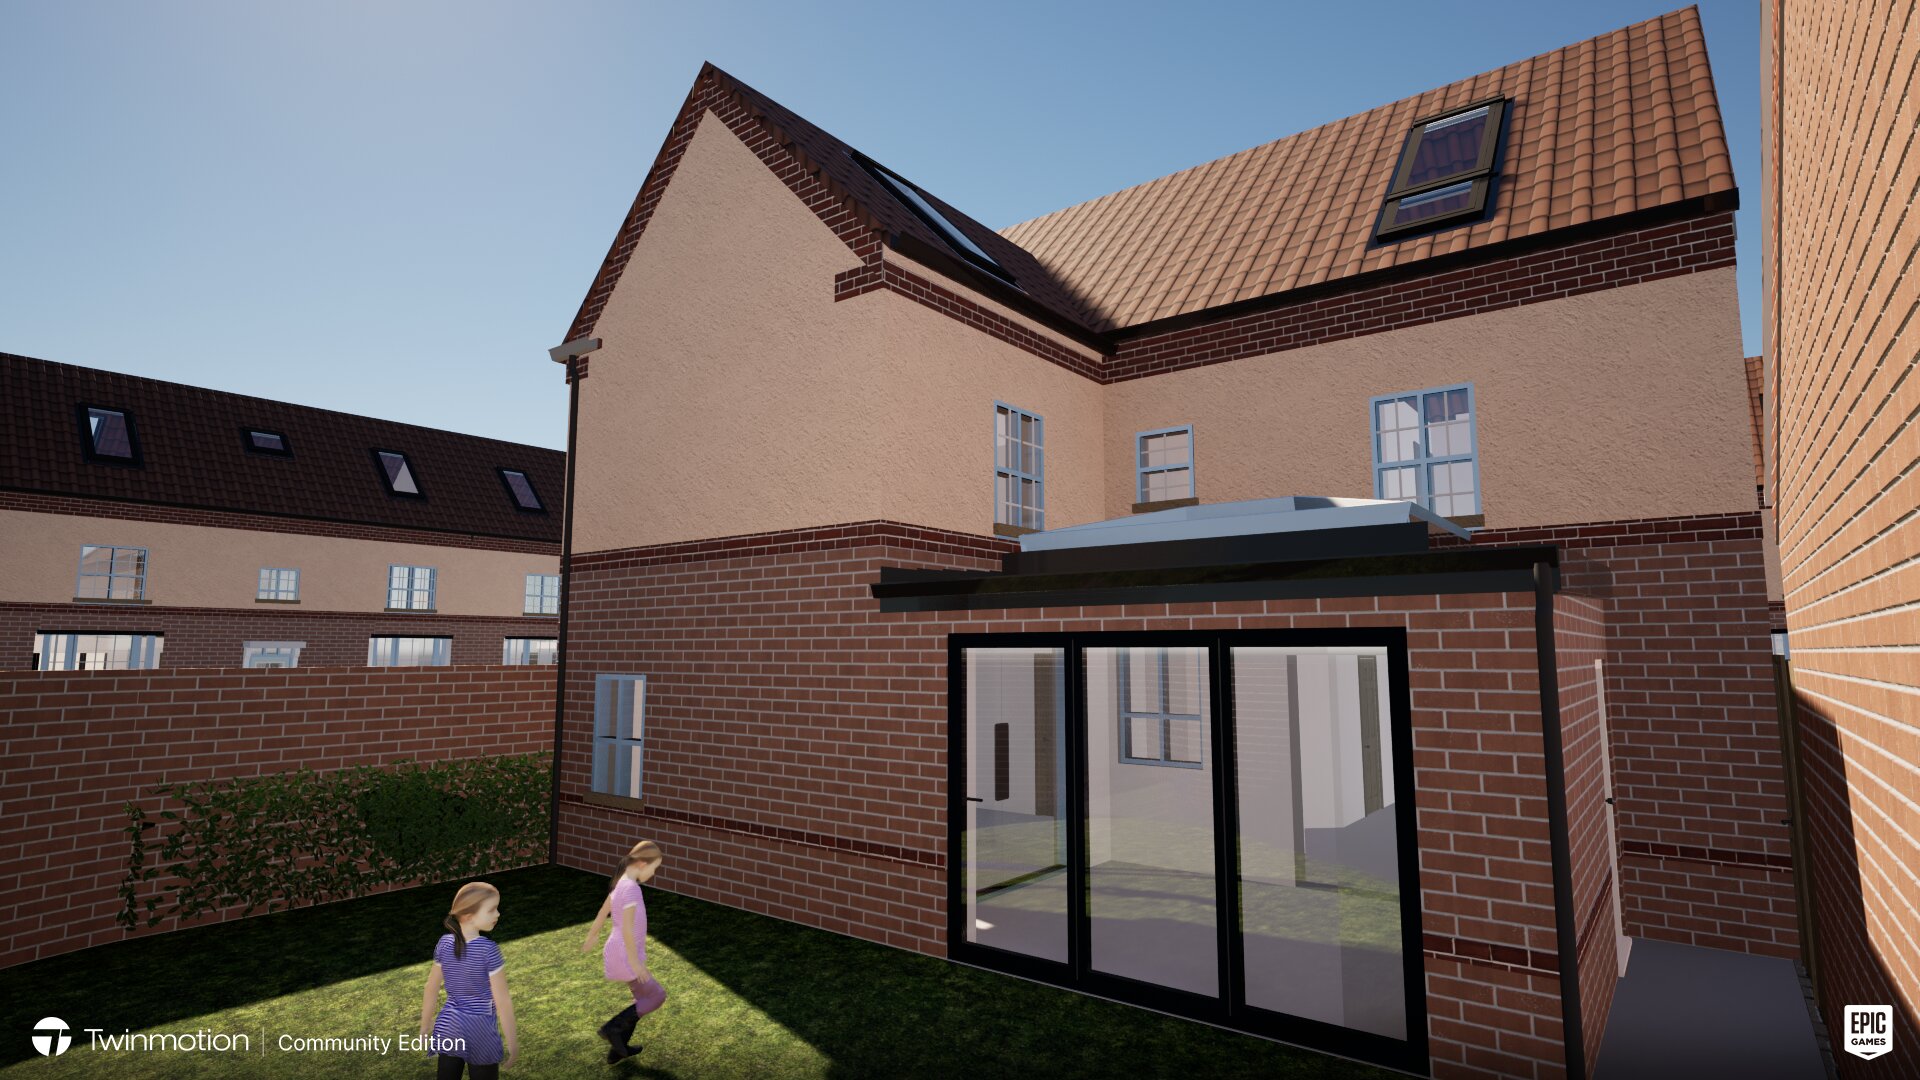
The materials used of the extension are the standard bricks and plaster for the main walls and an aluminium frame and handle for the bifold doors. The lantern’s sky light will be made
from uPVC as this is cheaper than aluminium and energy efficient, I think this option also looks aesthetically pleasing.
One of my first designs for the extension was to have the bifold only be a 2 door, however the elements to the door were larger and still covered all the wall spacing available.
I had to incorporate the BIM rules and regulations within my drawing and give a distance of 655mm from the corner wall to the beginning of the door, as this will ensure that the building
has structural integrity and will not risk collapsing.
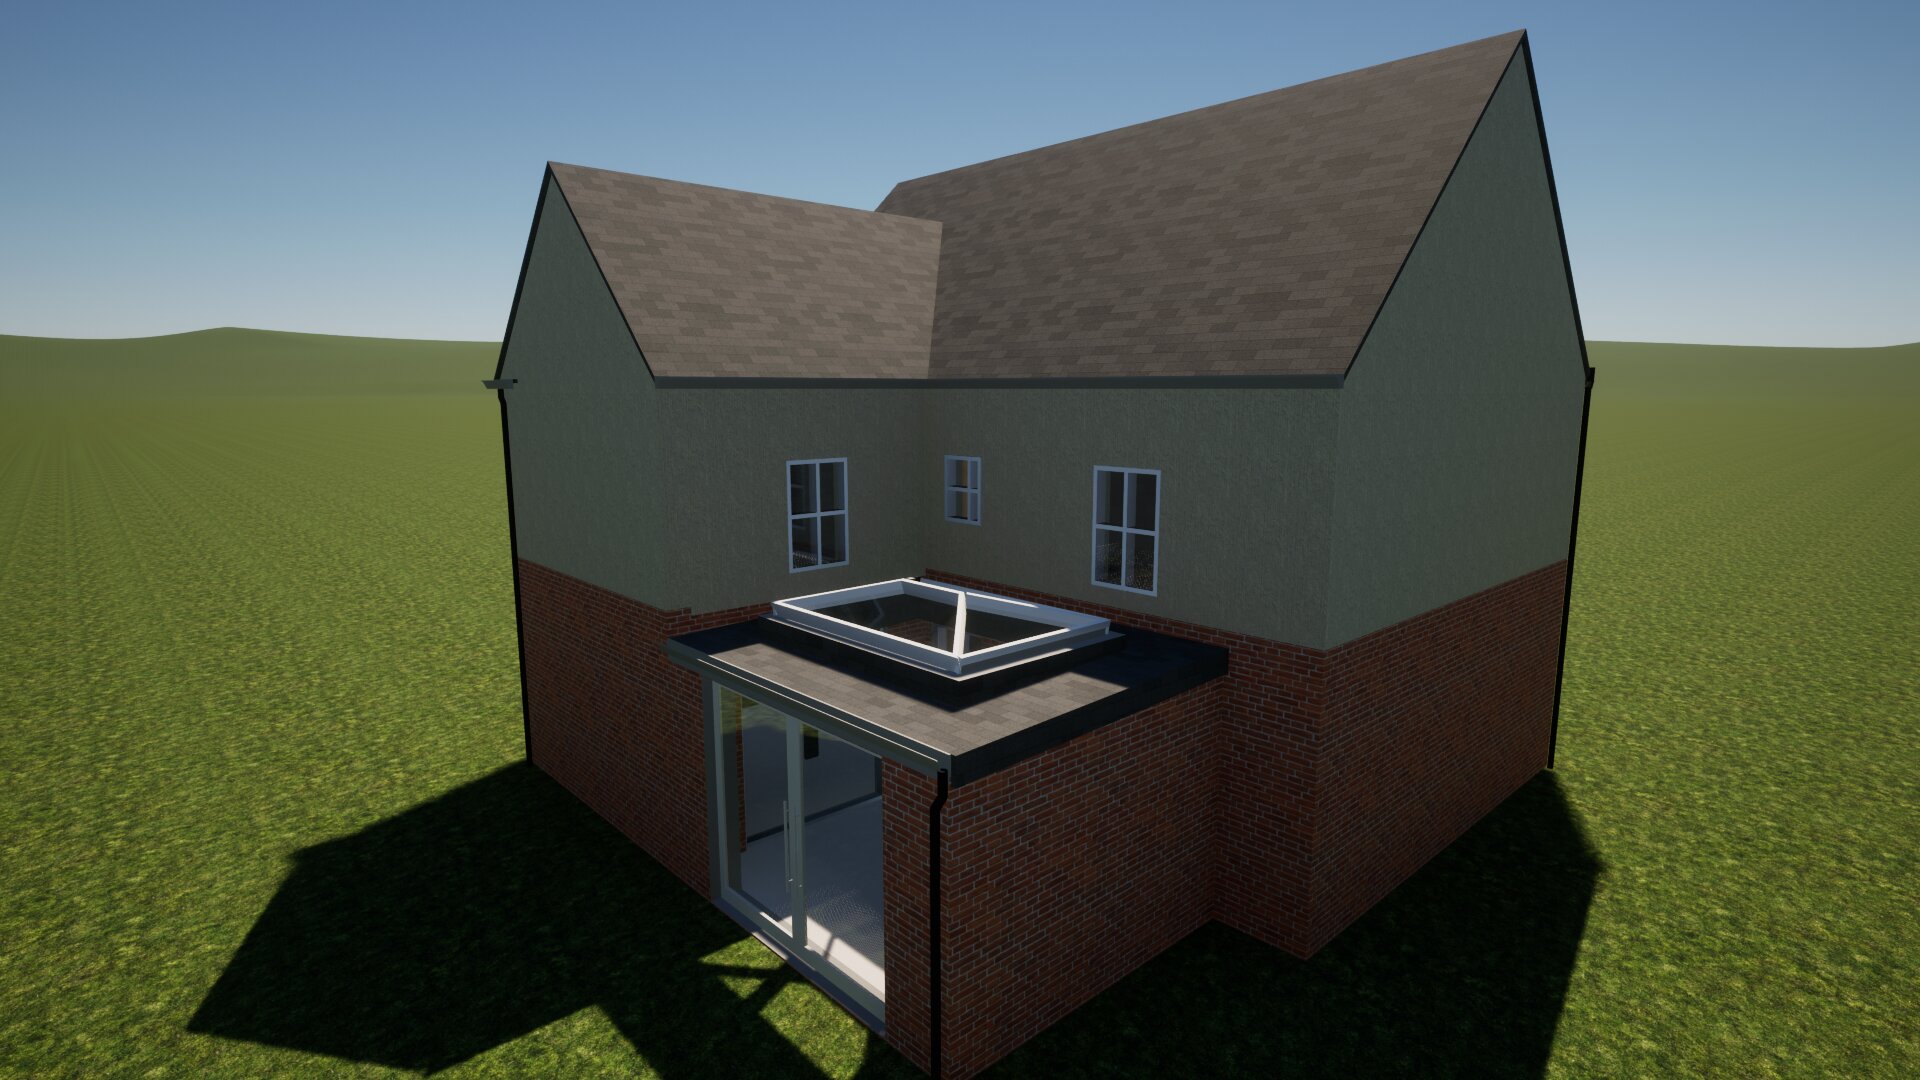
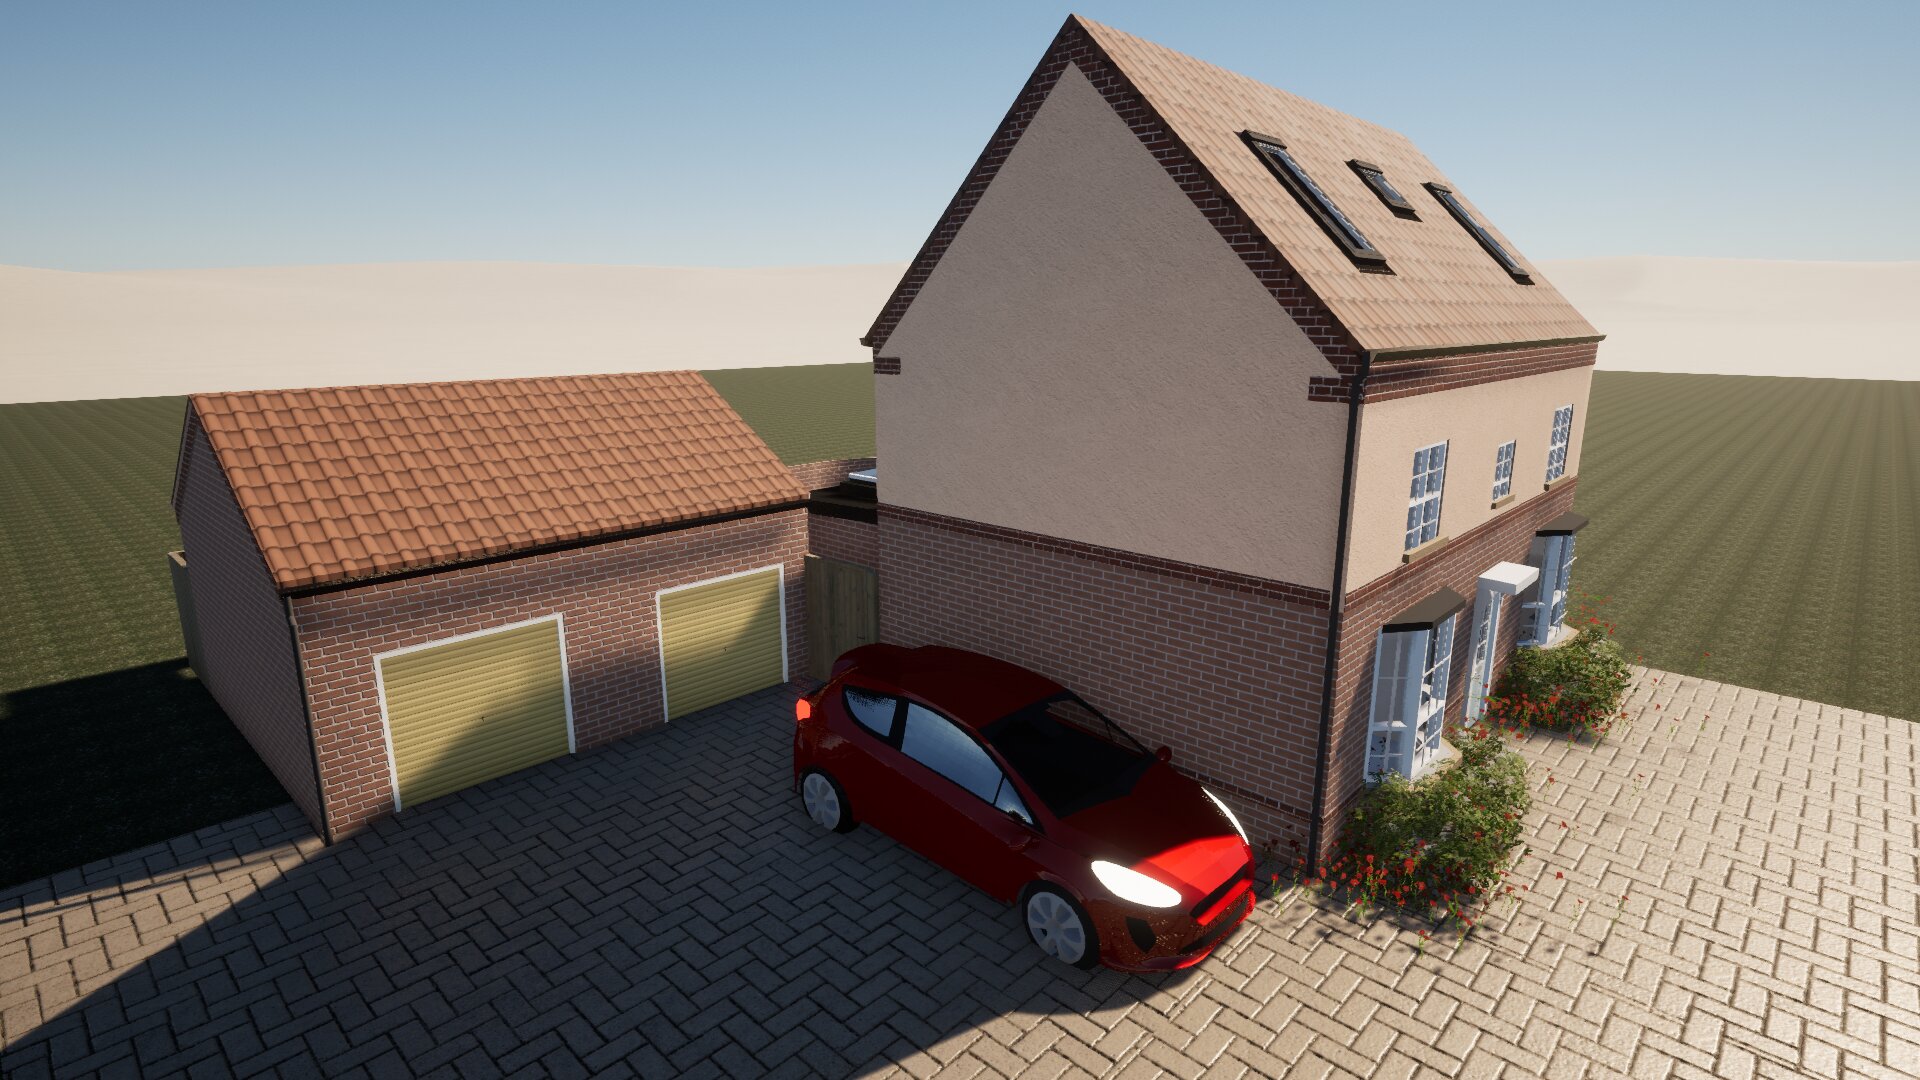
The render above is the first and most basic render of the project without all of the fine detailing
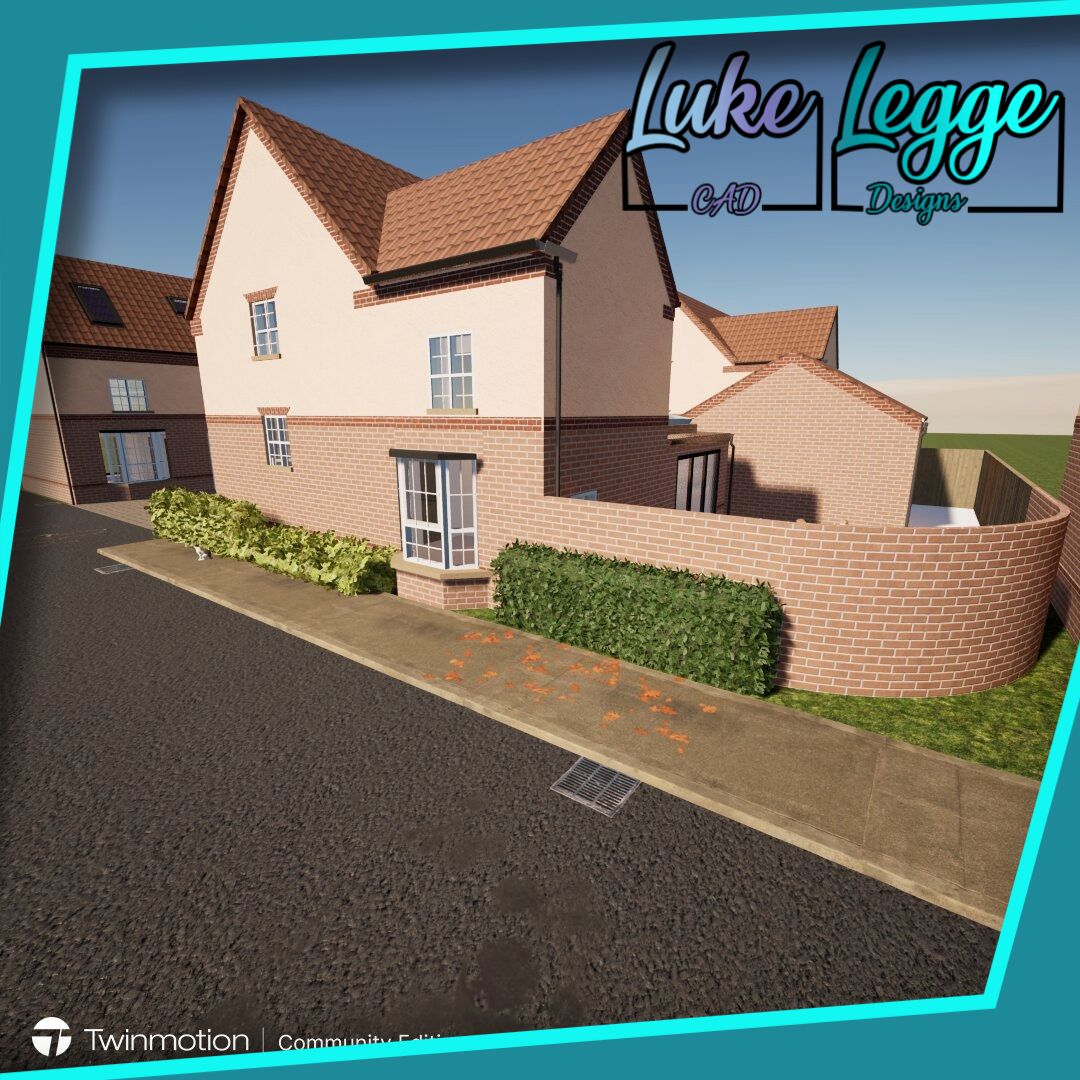
Above is the final render of the existing property.
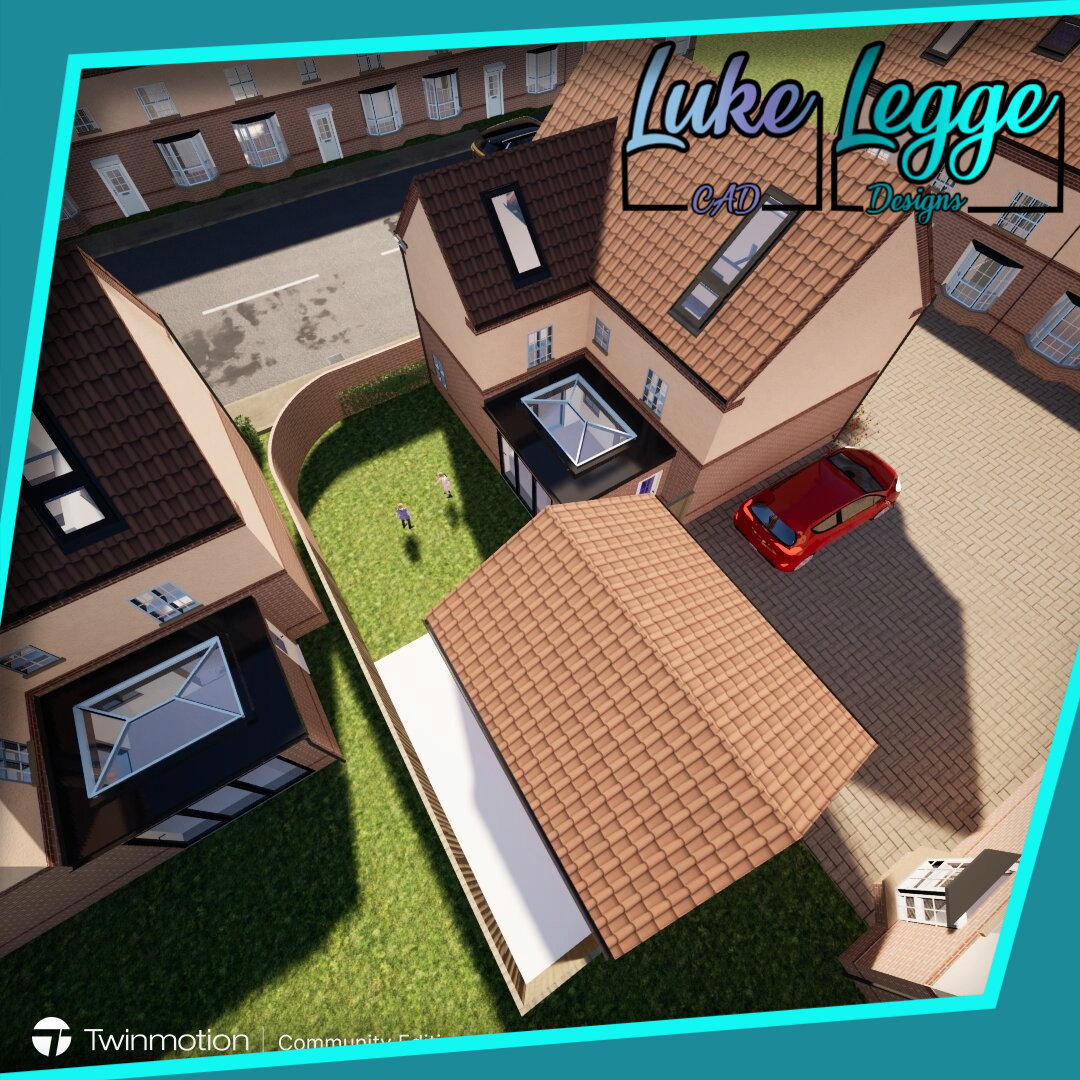
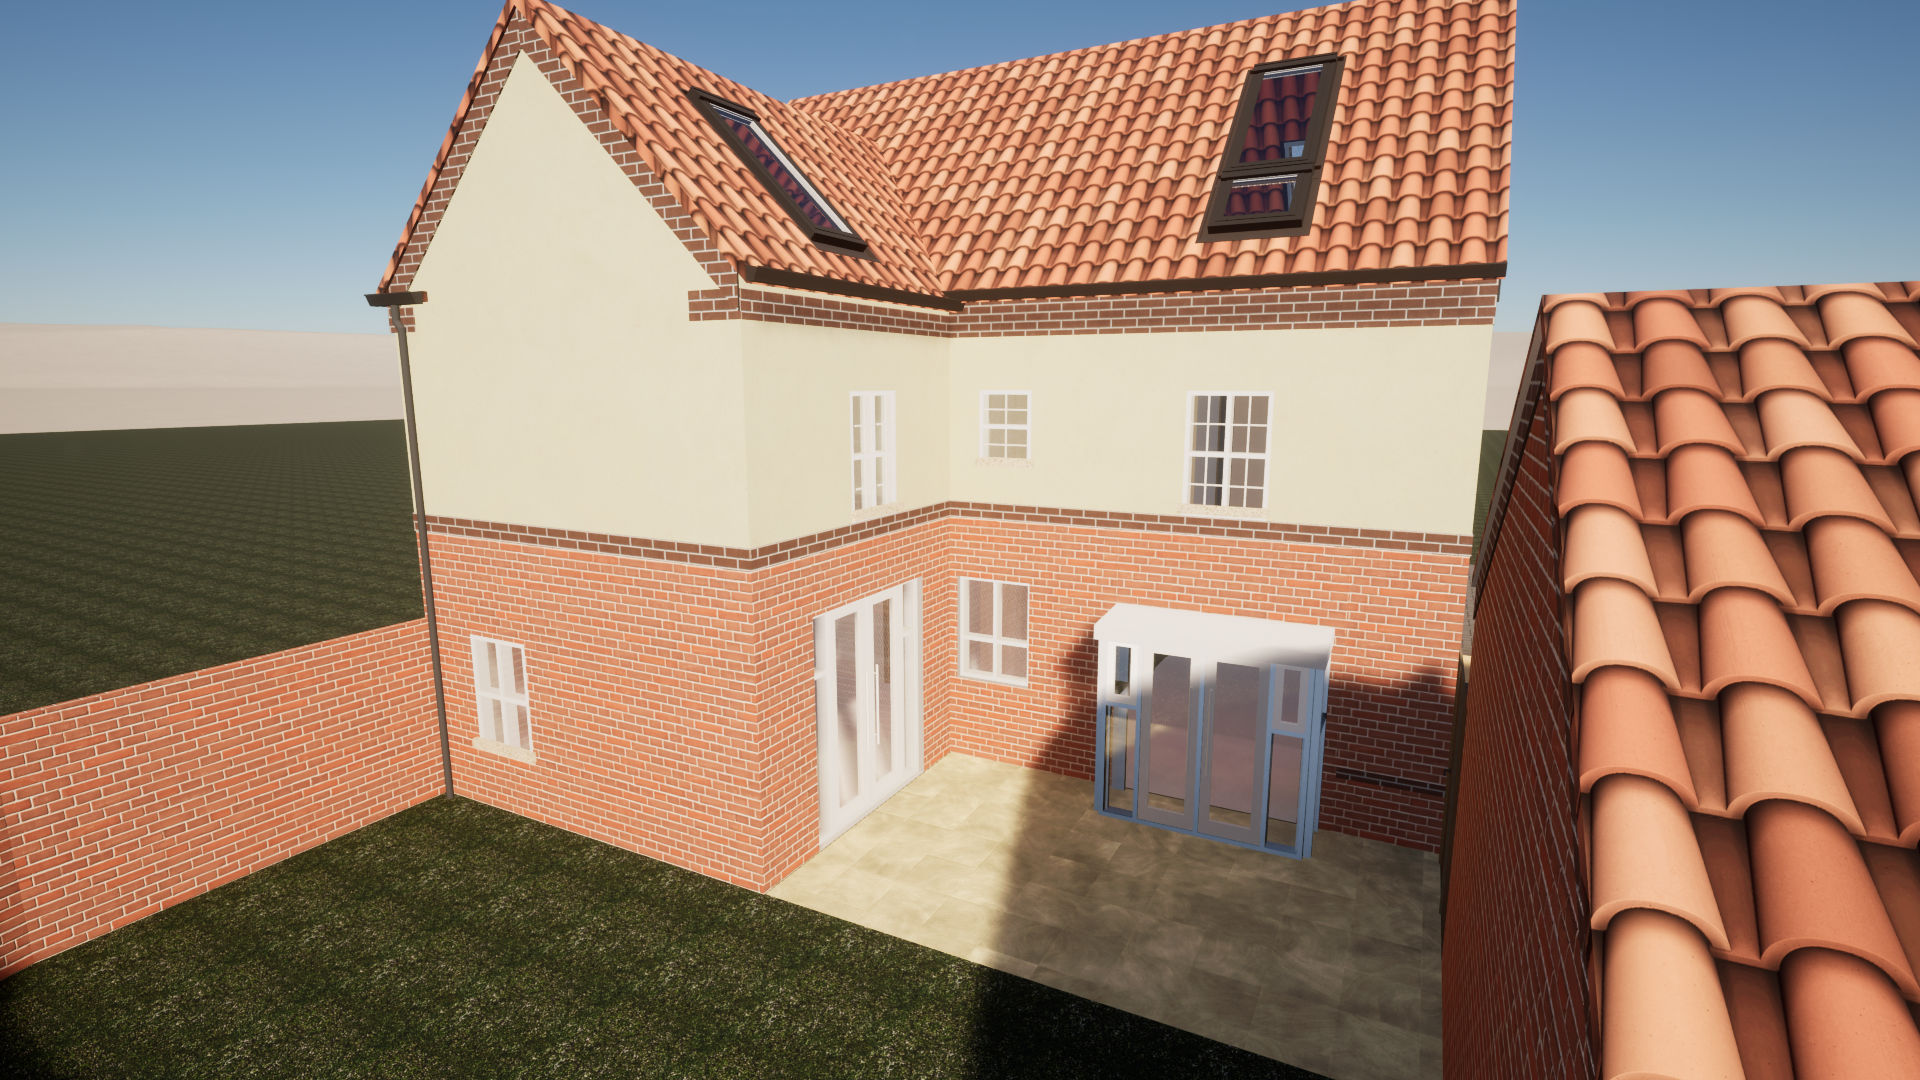
Above is my final render for this project. As seen, I added all of the fine detailing in with accurate brick work and I also made the windows to the property resemble the real-life house more.
As seen, I have added a 3 door bifold as per the clients request. I have also added the materials into the model to again make the final product more phot realistic.
For rendering purposes I created a replica of the garage however I did not measure it or create it to the exact scale. This is because the only reason its here is for rendering purposes,
therefore it would have been a waste of time measuring it when it adds no value to the technical drawings, however I did measure the distance from the house to the garage as this would be important
what the builders read the plans. I also added a car from my previous project here for rendering purposes.
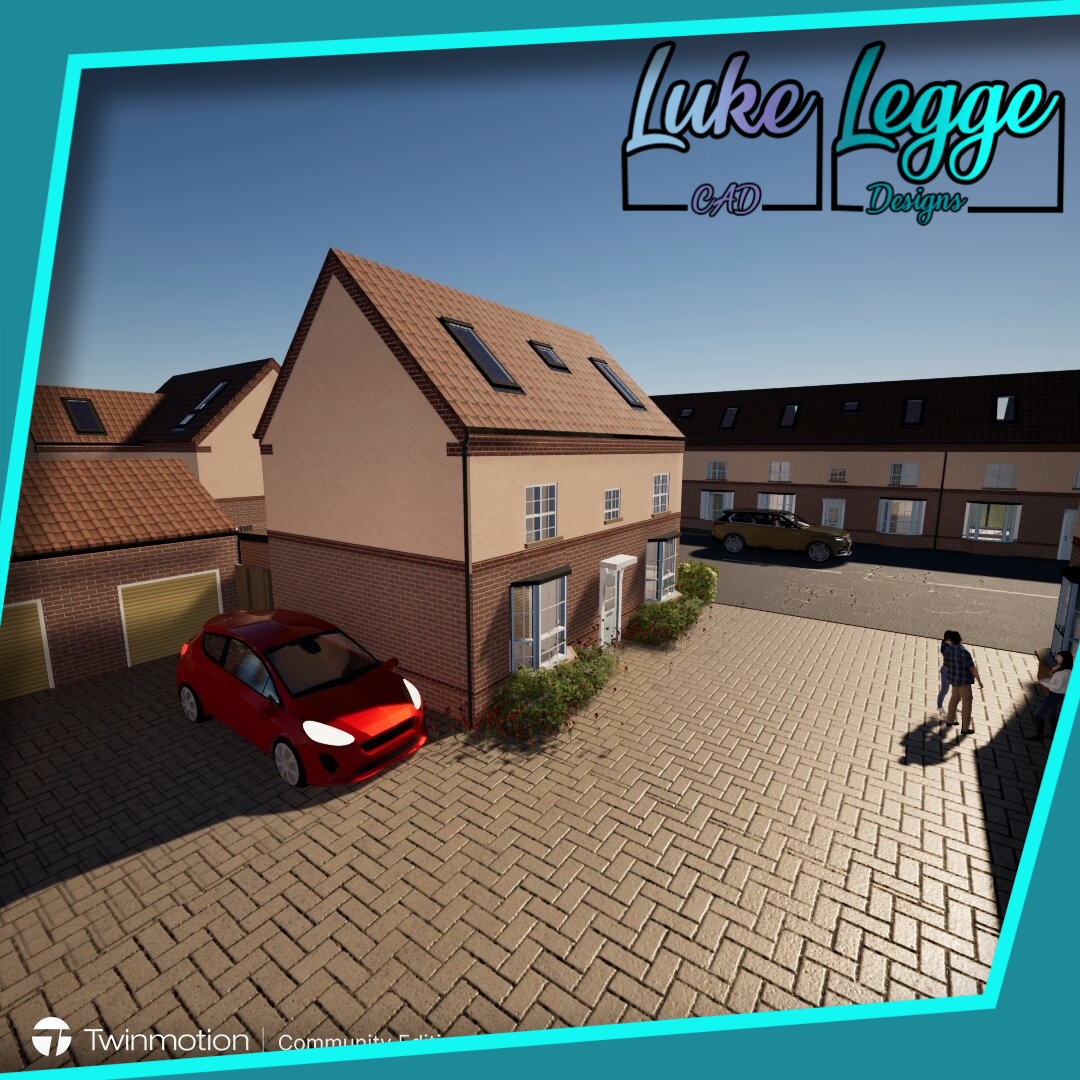
Above are some of my final renders that went on my Instagram and LinkedIn pages as I use both of these platforms as my live portfolio. As the project has progressed there’s been vast development within the design process
and the level of detail involved in the model.
In a project like this communication is key, as one of my goals was to ultimately learn and better my skills. I made sure that during the course of this project I had regular meetings with the head of BD architectural which had taken place in his office most weeks,
just a short cycle from my home in Nottingham. By communicating weekly and having that contact it meant that I always had the guidance of the mentor and that my work was being monitored regularly to ensure that progress was being made and I was on track.
As I was the only person assigned the project it meant that I didn’t have a team so unfortunately, I wasn’t able to practise my teamwork skills and communication within a team. If I can repeat a project similar to this, I would have enjoyed the opportunity to work
within a team because I feel this is something I’ve been lacking. Whilst I missed out on working in a team, I did get experience communicating with a client. The client of the project was my parents so this meant that I could talk to them about the proposed extension
at any time and I could make instant alterations to the plans according to their vison.
As an aspiring architect, I've learned firsthand that communication is the lifeblood of any successful project. It's not just about exchanging technical drawings and specifications; it's about creating a collaborative environment where everyone feels heard
and understood. Imagine trying to design a home without ever talking to the people who will live in it! That's the kind of disconnect that can happen when communication breaks down, as designers we don’t always think about the customers’ needs as unfortunately
this sometimes slips our minds.
From the initial client meeting, where I listen to their specifications, to the final walkthrough with the renders, every step requires clear and open understanding. I needed to be able to explain my design choices,
address concerns, and gather valuable feedback. And it's not just about communicating; it's about building an understanding where everyone feels comfortable sharing their thoughts and ideas.
Upon reflection for this project, I’m extremely happy with the outcome, not just the result but the knowledge and experience I have gained from the process.
I have vastly improved within Autodesk Revit in all areas, when beginning this project I was basically brand new to Revit and the only architecture experience
I had was ArchiCAD, so the switch to Revit wasn’t a huge jump however there were still some differences and barriers. I am now relatively comfortable in the
software and drawing to scale from measurements, as I had problems with the sizes of the walls and overall proportions. The problem was that the dimensions
would offset and change through the creation of the building throwing everything off and leading to most walls being larger or smaller then needed. I later found
that this was due to them not being locked in place leading them to change and then throw out all the proportions, this problem has ensured that now whenever using the
software I make sure that I lock my walls to prevent them from moving.
Another problem was that upon setting up the Revit document I had set the walls to the wrong size making them thinner than needed and also having many different walls that were not needed,
the way to avoid this problem is to set up the walls properly before starting the project and to set materials to the correct corresponding wall.
One of the keys things I learnt that I now take into most of my project is the usage of curtain walling and what a time saver and a powerful tool this is. Curtain walling makes it so easy to embed windows and doors
into existing walls and then to add curtain grids and use the add million tool to create an accurate window frames and door frames instead of creating a new family, this is such a time saver and a more effective method to get the desired result,
with this method it’s easy to get an exact replica of the windows and doors to be imitated.
Upon reflection I have also been able to improve my Twinmotion skills to create more photorealistic renders which was one of the targets I set myself at the beginning of this project. I think it’s important to get photorealistic renders at
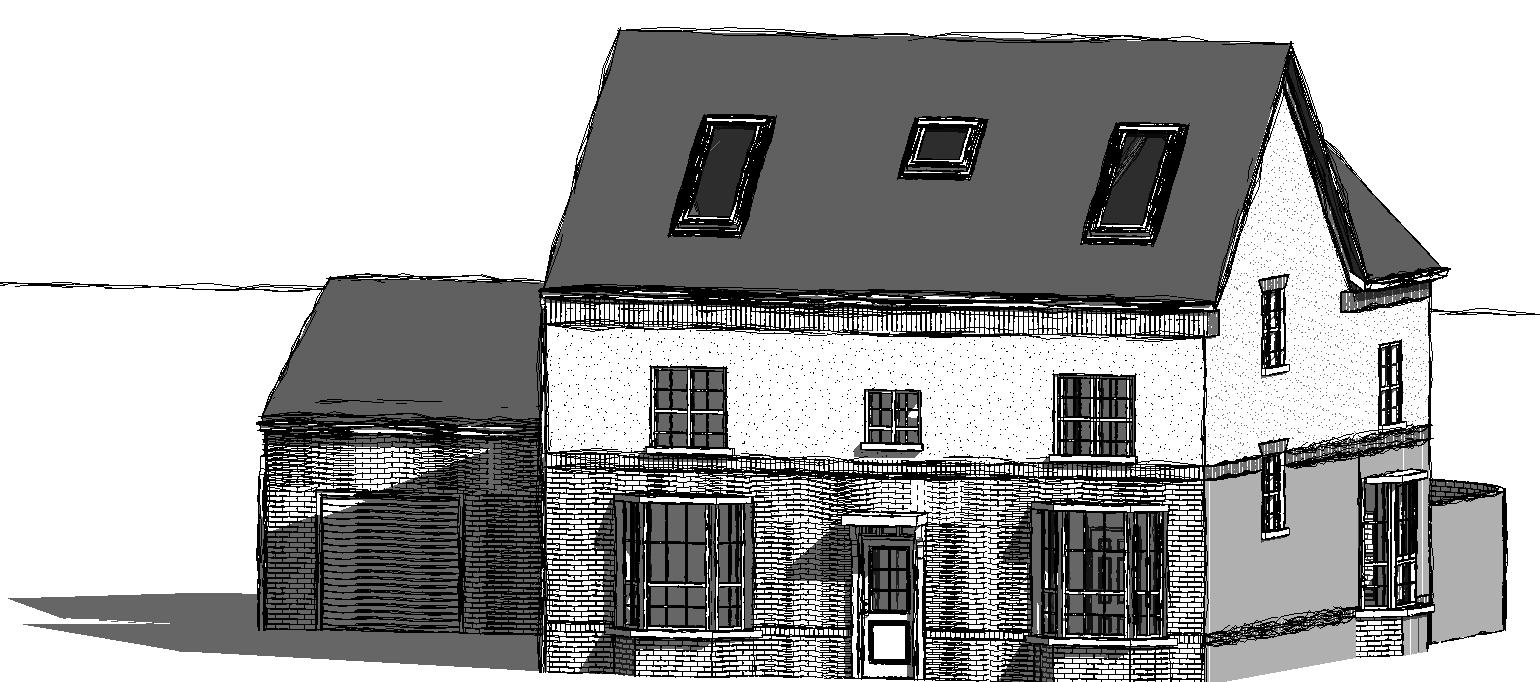
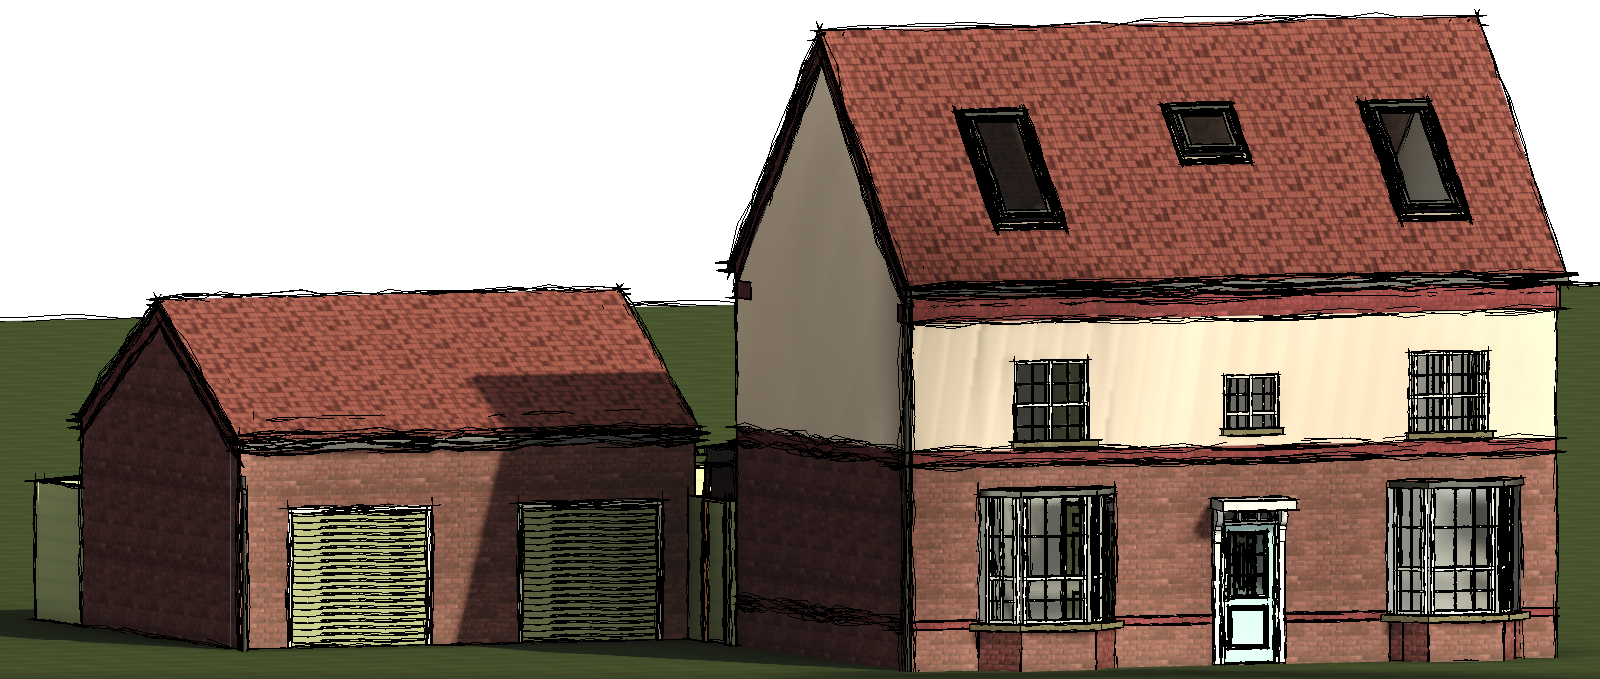
they make the work stand out so much more when on a portfolio, especially since one of the reasons for this project was to improve my portfolio. However, I also learnt how to use sketch lines and create renders that look like drawings,
I found this really appealing and feel that they can really stand out within my portfolio as these types of renders tend to be eye catching. I did create both a black and white version and a coloured version of these renders and both look appealing.
The biggest challenge within this project was to get the rendering right. Originally, I tried to work within Revit to complete a render however there are limitations within Revit in terms of renders and the final renders ended up with a green sky.
I overcame this challenge by doing all of my renders purely within Twinmotion as this allowed me in import existing assets so I could then populate my designs more. Twinmotion also gave better material renders and really elevated my work. in the future
I don’t think I’ll use Revit’s rendering as Twinmotion produces a much higher quality image and therefore is superior.
my handover documents consisted of a site plan which showed the landscape including the garden and the garage and the first floor. I also produced a few sheets, the sheets being, first floor existing, first floor proposed and the second floor existing and
proposed. If I were to take this project further, I’d produce technical drawings which are a set of detailed plans and notes outlining key points of construction used by the builders to better construct the architects vision. I also could have used my handover documents
to apply for planning permission from the council, which would have then allowed the project to have a confirmed design and ensure that everything is approved. I also could have produced a bill of materials which is basically the cost analysis of the project,
it would include the cost and the quantity of the extension materials which would then make it easier to give the client the price for materials and then labour.

as seen above I have my two main handover documents, my floor plan and my elevation, which will be given to the client so they can approve my designs and also be given to the builders for them to follow,
as mentioned before the builder will also need a technical drawing in order to streamline the process of building my designed extension.
My summer placement in the architectural field at BDarchitectural was an incredibly enriching experience, both professionally and personally. During this time, I had the opportunity to design an extension for a house,
applying my theoretical knowledge to a real-world project. This task allowed me to refine my skills in architectural design, more specifically Autodesk Revit and build upon my problem-solving, and client communication skills.
The high-quality renders and industry-standard work I produced are a testament to my dedication and effort put in over the summer. Seeing the results of my work has been immensely rewarding and has significantly boosted
my confidence in my abilities within the software used. Each step, from initial sketches to final renderings, honed my attention to detail and solidified my understanding of architectural workflows. Moreover, working alongside an experienced architect and an industry professional
provided me with invaluable insights into the practicalities of the profession. The feedback and guidance I received played a crucial role in shaping my approach to design and execution. I learned the importance of balancing aesthetic considerations with functional requirements, as well as adhering to
building codes and regulations also known as BIM. This placement also outlined the significance of effective communication in achieving project goals from communication with a manager/ supervisor to client communication. Engaging with clients to understand their vision and requirements was a key aspect of
the design process, teaching me how to translate client needs into viable design solutions.
Overall, this placement deepened my understanding of architectural principles and affirmed my passion for this field as a potential career path. I am grateful for the mentorship and support I received, and I look forward to leveraging
this experience in my future endeavours in architecture and juts the design industry in general. The skills and knowledge I gained will undoubtedly
serve as a strong foundation for my continued growth and success in the industry.
myhours.com(2024) the importance of time management available at: https://myhours.com/articles/the-importance-of-time-management [accessed 29 October 2024].
Rosseland, B.O., Eldhuset, T.D. & Staurnes, M. (1990) Environmental effects of aluminium. Environ Geochem Health available at: https://doi.org/10.1007/BF01734045[acessed 14 November 2024]
The Aluminum Association (2021). Sustainability – Recycling | Aluminum Association. [online] www.aluminum.org. Available at: https://www.aluminum.org/Recycling. [accessed November 14 2024]
United Nations (06/2021) Plastic is Forever, Available at: https://www.un.org/en/exhibits/exhibit/in-images-plastic-forever#:~:text=Plastic%20waste%20can%20take%20anywhere,in%20the%20last%2013%20years (Accessed: 18/11/2024).
Iea50(03/2022) global energy review:CO2 emissions in 2021, available at https://www.iea.org/reports/global-energy-review-co2-emissions-in-2021-2(accessed 18/11/2024).